By the end of Chapter 4 ShipShape looked finished — Welcome, the four Step pages, History, and the Ready-to-Ship screen all laid out. But run it, change something, quit, and relaunch: every change is gone. The app has no memory. Real apps remember what you typed yesterday.
In this chapter you'll give ShipShape a memory by saving a release draft — the version number, the "What's New" notes, and a pre-flight checklist — to a file on disk, then reading it back the next time the app launches. Persistence sounds like a big topic, and it touches a lot of files and the file system, so this is also the chapter where you'll pick up the Swift tools that make that kind of work safe:
- Optionals — how Swift models "there might not be a value here," and how to read one without crashing.
guard— leaving a function early, the moment something's missing.- Closures and
map— passing a block of code around to transform one collection into another. - Error handling —
throws,do/try/catch, andtry?, so a disk failure tells you instead of taking the app down with it. Codableserialization — turning a Swift value into bytes you can write, and back again.
That's a full toolbox, but every tool earns its place in the same small feature. Let's build it.
Where Should the Draft Live?
Before writing a byte, decide where. iOS gives you a few homes for data, and picking the right one matters:
@AppStorage/UserDefaults— tiny, loose values: a theme choice, "has the user seen onboarding," a sort order. Great for settings, wrong for structured documents.- A file in the app's Documents directory — one self-contained blob of structured data you load on launch and save on change. This is exactly the shape of a single release draft.
- SwiftData or Core Data — many records you query, filter, and relate to each other. Overkill for one draft; the right call once you have hundreds of them.
A single draft is one structured blob, so you'll write it to one file — specifically a property list (.plist), the same key-value format Xcode uses for Info.plist. Foundation can turn a Codable Swift value straight into property-list bytes and back, which keeps the code short.
Modeling what you save
Create a new Swift File named ReleaseDraft.swift in the Model group. A draft is two types — one row of the checklist, and the draft as a whole:
import Foundation

struct ChecklistItem: Codable, Identifiable {
  var id = UUID()
  var title: String
  var isDone: Bool = false
}

struct ReleaseDraft: Codable {
  var version: String = ""
  var whatsNew: String = ""
  var checklist: [ChecklistItem] = []
  var submittedAt: Date?
}
Two things to notice. First, ChecklistItem is Identifiable — the same trick you used for ShipDay in Chapter 4, so ForEach can tell the rows apart. Second, both types conform to Codable.
Codable buys youCodable is Swift's "I can be converted to and from a flat data format" protocol. When every stored property of a type is itself Codable — and String, Bool, UUID, Date, and arrays of Codable things all are — the compiler synthesizes the conversion code for you. You write Codable; you don't write a single line of encoding logic. That's why modeling the data well up front pays off: get the struct right and saving is nearly free.
That last property, submittedAt, is the one to slow down on. A draft the user is still editing hasn't been submitted yet — so it has no submission date. Swift has a precise way to say "a Date, or nothing at all," and it's worth a proper introduction.
Optionals: Modeling "Maybe There's a Value"
The ? after Date makes submittedAt an optional. An optional is a value that's either present (and wraps a real Date) or absent — written nil. A non-optional Date can never be nil; an optional Date? can.
Under the hood Date? is shorthand for Optional<Date>, an enum with two cases: .some(Date) when there's a value, and .none when there isn't (nil is just a friendly spelling of .none). That's why you can't use an optional as if it were the value inside — you have to unwrap it first, the way you'd switch over any enum to get at its associated value. The unwrapping syntax below is sugar over exactly that.
You can't read the Date inside a Date? directly — you have to unwrap it. The safe, everyday way is if let:
if let submittedAt = draft.submittedAt {
  // runs only when there IS a date; `submittedAt` here is a plain Date
  print("Shipped on \(submittedAt.formatted(date: .abbreviated, time: .omitted))")
} else {
  print("Still a draft")
}
When draft.submittedAt is nil, the if block is skipped entirely. When it holds a value, that value is unwrapped into the new constant and the block runs. (formatted(date:time:) is Foundation's built-in date renderer — .abbreviated gives you something like Jun 18, 2026.)
There's a shorthand for the common case where the optional is already a value of its own name in scope. If you'd pulled the optional into a local first, you could drop the = submittedAt and let the names line up:
let submittedAt = draft.submittedAt   // a Date?

if let submittedAt {   // shorthand for `if let submittedAt = submittedAt`
  // ...
}
The shorthand only works when the unwrapped name matches the optional's own name — it can't reach through a member path like draft.submittedAt directly.
Reaching into optionals: chaining and defaults
Two more tools you'll use constantly. Optional chaining with ?. reads through an optional and stops short — returning nil — if anything along the way is absent:
let firstTitle = draft.checklist.first?.titlechecklist.first is optional (the array might be empty). The ?. says "if there is a first item, give me its title; otherwise the whole expression is nil." So firstTitle is a String?.
The nil-coalescing operator ?? supplies a fallback for when an optional is nil:
let firstTitle = draft.checklist.first?.title ?? "No steps yet"Now firstTitle is a plain String — the real title if there is one, "No steps yet" if the list is empty. ?? is the cleanest way to turn "maybe a value" into "definitely a value."
The exclamation mark, and why to leave it alone
Swift has one more unwrap: the force-unwrap !. It rips the value out of an optional and crashes the app if the optional is nil:
let date = draft.submittedAt! // 💥 crashes the instant submittedAt is nilIt's tempting — it makes the optional "go away." But it trades a compile-time safety net for a runtime crash, and on a draft that hasn't shipped, submittedAt is nil by design. The whole point of optionals is to force you to handle the empty case; ! opts out of that. Reach for if let, ??, or guard (next) instead, and save ! for the rare case where nil would be a genuine programmer error you want to crash on.
Mini-exercise
Without running anything, work out the type and value of each:
let a = draft.checklist.first— what type?let b = draft.checklist.first?.isDone ?? false— what type, and what value whenchecklistis empty?- Why does
let c: Bool = draft.checklist.first?.isDonefail to compile?
(Answers: a is ChecklistItem?; b is a plain Bool, false when empty; c fails because you're putting a Bool? — which could be nil — into a Bool, which can't hold nil. Add ?? false and it compiles.)
guard let: Leave Early When Something's Missing
if let runs code when a value is present. Often you want the opposite shape: bail out immediately when it's absent, then carry on with the happy path un-indented. That's guard let.
Say you only want to stamp a submission date when the draft actually has a version number. Add this method to ReleaseDraft (you'll wire it to a button later):
mutating func markSubmitted() {
  guard !version.isEmpty else {
    print("Refusing to submit: no version set")
    return
  }
  submittedAt = Date()
}
guard states a condition that must hold; its else block runs when the condition fails and must leave the current scope — here with return. The payoff: after the guard, you're guaranteed version isn't empty, with no extra nesting. guard let optional else { return } works the same way and unwraps the value into the rest of the function, not just a block — which is exactly what you'll use when loading from disk.
if let vs guard letBoth unwrap. The difference is scope and intent. if let x { … } makes x available inside the braces and reads as "do this when present." guard let x else { return } makes x available for the rest of the function and reads as "I can't continue without this." Use guard for preconditions at the top of a function; use if let for a branch in the middle.
Closures and map: Transforming the Checklist
The Release Draft screen shows a small footer — "2 of 4 done" — summarizing the checklist. To build it you need to count the finished items and, elsewhere, list their titles. Both are transformations of the checklist array, and the idiomatic way to transform a collection in Swift runs through closures.
A closure is just a block of code you can store in a variable and pass around — like a function without a name. Here's one that turns a checklist item into a display string:
let label: (ChecklistItem) -> String = { item in
  item.isDone ? "✓ \(item.title)" : "○ \(item.title)"
}
Read the type (ChecklistItem) -> String as "takes a ChecklistItem, returns a String." The code between the braces is the closure's body; item in names the incoming parameter. Assigning the closure doesn't run it — label now holds that code. You run it by calling it:
label(draft.checklist[0]) // "✓ Screenshots uploaded"Passing a closure to map
Array has a method, map(_:), that takes a closure, runs it once per element, and collects the results into a new array. Feed it your label closure and you get an array of display strings:
let lines = draft.checklist.map(label)
// ["✓ Screenshots uploaded", "✓ Metadata reviewed", "○ Keywords finalized", "○ Final QA pass"]
Usually you don't bother naming the closure — you write it right at the call site. And because the closure is map's last (only) argument, you can move it outside the parentheses as a trailing closure:
let titles = draft.checklist.map { item in
  item.title
}
When the closure is this short, Swift lets you drop the parameter name and refer to the argument as $0 (the first parameter, $1 the second, and so on):
let titles = draft.checklist.map { $0.title }All three spellings produce the same [String]. There's an even terser form for "just pull out this property" — a key path:
let titles = draft.checklist.map(\.title)filter, then count
map transforms every element; its cousin filter keeps only the ones that pass a test. Chain filter and count to build that footer:
let doneCount = draft.checklist.filter { $0.isDone }.count
let summary = "\(doneCount) of \(draft.checklist.count) done"   // "2 of 4 done"
filter { $0.isDone } returns just the finished items; .count tallies them. You'll drop this straight into the view in a moment.
You could write a for loop with a running counter — and sometimes that's clearer. But map/filter/reduce say what you want ("the titles," "the done ones") instead of how to accumulate them, and they let you declare the result with let because it's computed in one shot. SwiftUI itself is built on closures — every Button(action:), every ForEach { … }, every .onTapGesture { } hands SwiftUI a block of code to run later. Getting comfortable with them here pays off everywhere.
Saving the Draft to Disk
You've modeled the data and learned the supporting tools. Time to write bytes. Here's the whole round-trip you're about to build — the draft becomes bytes and lands on disk when you save, and the bytes come back and rebuild the draft when you load:
The two halves are mirror images: Codable plus an encoder turns a value into bytes, and the decoder turns bytes back into a value. Create a new Swift File named DraftStore.swift in the Model group. Start with the file location and the save method:
import Foundation
import Observation

@Observable
final class DraftStore {
  var draft = ReleaseDraft()

  private var fileURL: URL {
    URL.documentsDirectory.appending(path: "release-draft.plist")
  }

  func save() throws {
    let data = try PropertyListEncoder().encode(draft)
    try data.write(to: fileURL, options: .atomic)
  }
}
Working outward:
URL.documentsDirectoryis the app's private Documents folder — the sanctioned place for user data that should persist and back up. Appending a file name gives you the full path to write to.PropertyListEncoder().encode(draft)is whereCodableearns its keep: it turns yourReleaseDraftinto aDatavalue — a buffer of bytes in property-list format. No hand-written conversion, because the compiler synthesized it.data.write(to:options:.atomic)writes those bytes to the file..atomicwrites to a temporary file first and swaps it in only once the write fully succeeds, so a crash mid-write can never leave a half-written, corrupt draft on disk.
Why throws?
Notice func save() throws and the try before each call. Talking to a file system is the textbook place for things to go wrong — the disk is full, the path is bad, permissions changed. Both encode and write are marked as able to fail, so Swift requires you to acknowledge that with try, and a function that contains an un-handled try must itself be marked throws. That's not bureaucracy — it's the compiler refusing to let you forget that disk access can fail. The next section is where you decide what to do about it.
PropertyListEncoder and JSONEncoder have identical APIs — swap one for the other and encode(draft) still works. Use a property list for data that stays inside your app (it's compact and native to Apple's tooling). Reach for JSON when the data crosses a boundary — sent to a server, shared with a web app, or read by a tool on another platform. ShipShape's draft never leaves the device, so a plist is the natural fit.
Errors as Values
Right now save() lets the underlying Foundation errors fly straight out. That works, but you can give callers something cleaner to react to by defining your own errors. In Swift, an error is just a value of a type that conforms to the Error protocol — most often an enum. Add one inside DraftStore:
enum StoreError: Error {
  case writeFailed
  case readFailed
}
Now wrap the risky work and translate any failure into your own vocabulary:
func save() throws {
  do {
    let data = try PropertyListEncoder().encode(draft)
    try data.write(to: fileURL, options: .atomic)
  } catch {
    throw StoreError.writeFailed
  }
}
The shape here is the one you'll use everywhere errors show up:
do {
  try somethingThatThrows()
} catch {
  // `error` is in scope here; decide what to do
}
If anything inside do throws, execution jumps straight to catch. You can match specific cases — catch StoreError.writeFailed { … } — or catch everything with a bare catch. And when you genuinely don't care why something failed, only whether it did, try? converts a throw into a nil:
let data = try? Data(contentsOf: fileURL) // a Data?, or nil if it threwYou'll lean on try? in just a moment, because the first time the app ever runs, there's no file to read — and that's not an error worth shouting about.
Loading the Draft Back
Saving is half the round-trip. Add load() to DraftStore:
func load() throws {
  guard let data = try? Data(contentsOf: fileURL) else {
    return
  }
  do {
    draft = try PropertyListDecoder().decode(ReleaseDraft.self, from: data)
  } catch {
    throw StoreError.readFailed
  }
}
The decode mirrors the encode: PropertyListDecoder().decode(ReleaseDraft.self, from: data) reads the bytes back into a ReleaseDraft. You pass ReleaseDraft.self so the decoder knows what type to build.
The interesting line is the guard. On a brand-new install there is no release-draft.plist yet, so Data(contentsOf:) will fail — and that's completely normal, not a failure to report. try? turns that failure into nil, and guard let … else { return } quietly bails out, leaving draft as the empty default. A missing file on first launch is expected; only a file that exists but won't decode is a real readFailed worth surfacing.
This is the payoff for the earlier sections coming together: try? to forgive the expected-missing case, guard let to leave early, do/catch to convert a genuine failure into your own StoreError. Wire load() into the store's initializer so it runs at launch:
init() {
  do {
    try load()
  } catch {
    showLoadError = true
  }
}
You'll add showLoadError next — it's the bridge from "something went wrong on disk" to "tell the user."
Observing the Store in SwiftUI
The @Observable macro at the top of DraftStore is what lets SwiftUI watch it. Mark a class @Observable and any view that reads one of its properties automatically redraws when that property changes — no manual notifications. Add the error flag the initializer referenced:
@Observable
final class DraftStore {
  var draft = ReleaseDraft()
  var showLoadError = false
  // … fileURL, StoreError, init, save, load …
}
One store should outlive every view and be shared by all of them, so create it once at the app's entry point and drop it into the environment. Open ShipShapeApp.swift:
@main
struct ShipShapeApp: App {
  @State private var store = DraftStore()

  var body: some Scene {
    WindowGroup {
      ReleaseDraftView()
        .environment(store)
    }
  }
}
@State here gives the store a single, stable home for the app's whole lifetime — it's created once and never re-initialized on a redraw. .environment(store) makes it reachable from any view in the hierarchy without passing it down by hand.
Reading and binding to the store in a view
Create a new SwiftUI View named ReleaseDraftView.swift. Pull the store out of the environment and bind the form fields straight to it:
struct ReleaseDraftView: View {
@Environment(DraftStore.self) private var store
var body: some View {
@Bindable var store = store
NavigationStack {
Form {
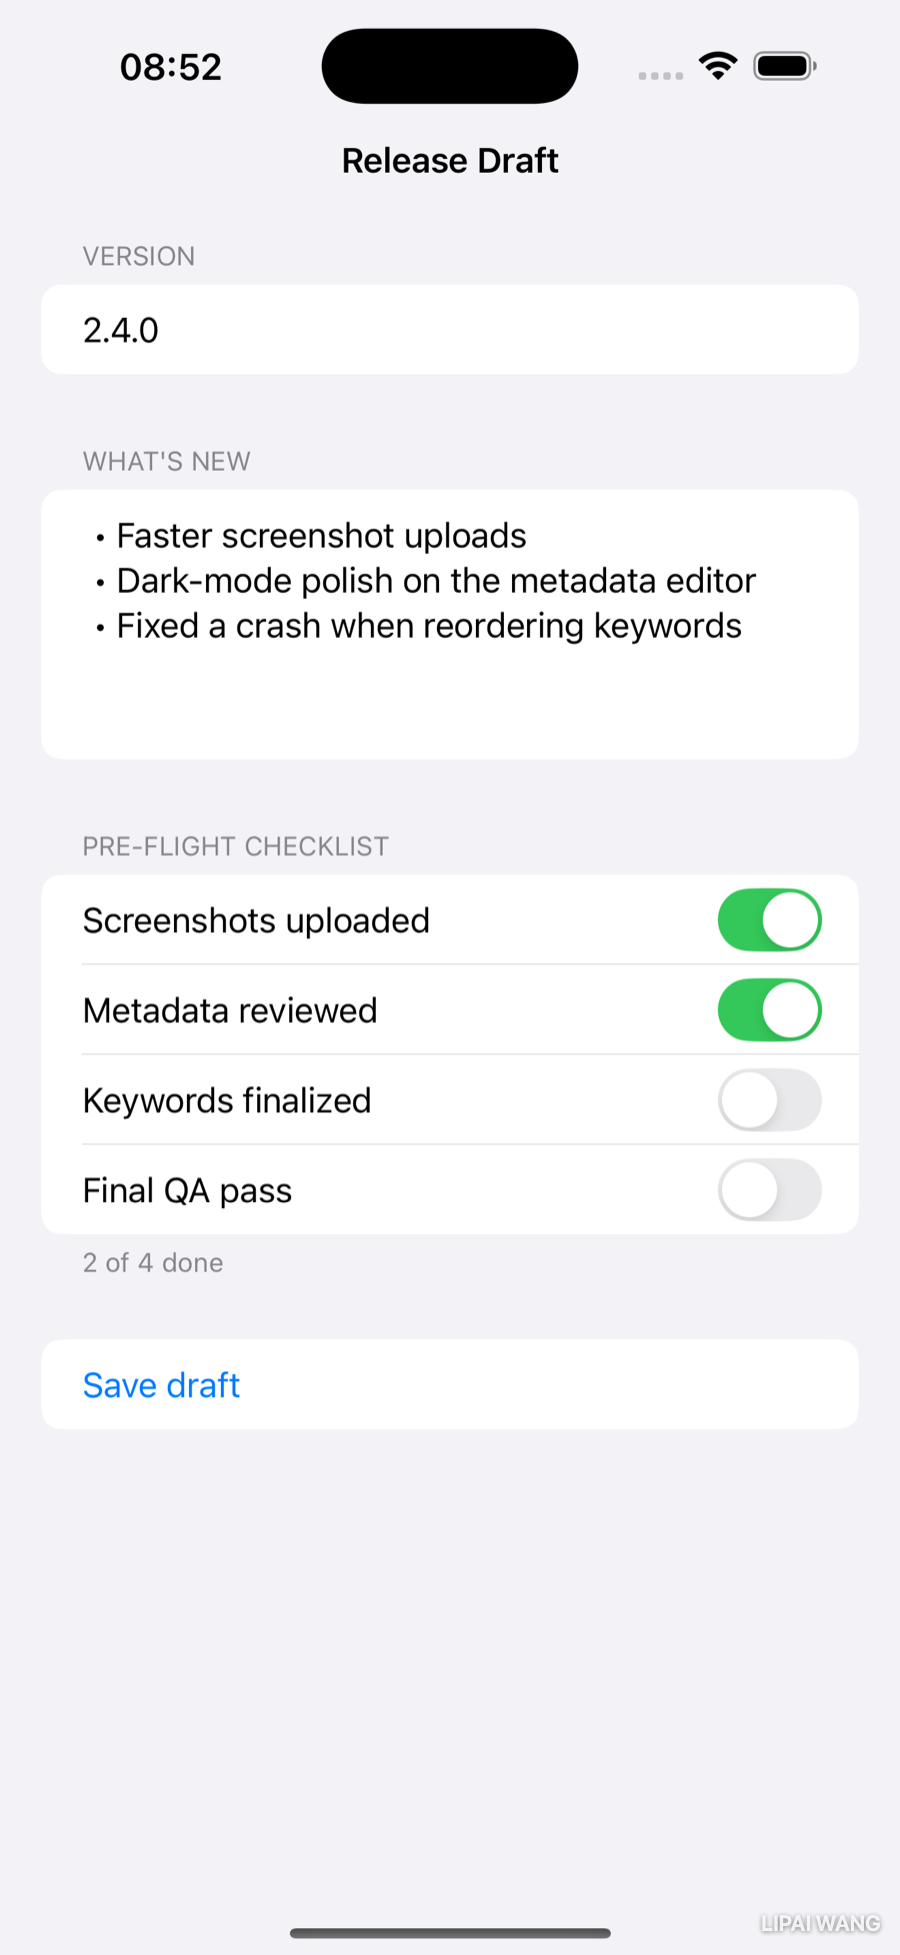
Section("Version") {
TextField("e.g. 2.4.0", text: $store.draft.version)
}
Section("What's New") {
TextEditor(text: $store.draft.whatsNew)
.frame(minHeight: 110)
}
Section("Pre-flight checklist") {
ForEach($store.draft.checklist) { $item in
Toggle(item.title, isOn: $item.isDone)
}
}
Section {
Button("Save draft") { try? store.save() }
}
}
.navigationTitle("Release Draft")
}
}
}Two new pieces of syntax:
@Environment(DraftStore.self)reads the store the app put into the environment.@Bindable var store = store—@Environmenthands you a read-only reference, butTextFieldandToggleneed two-way bindings ($store.draft.version) so edits flow back into the store. Wrapping it in a local@Bindableproduces those$-prefixed bindings. TheForEach($store.draft.checklist) { $item in … }loops with a binding per row, so eachTogglewrites straight back into itsChecklistItem.
Here's the screen, driven entirely by the store:
Confirming the save
A silent save leaves the user wondering if anything happened. Show a brief confirmation when save() succeeds. Add a little state and an overlay, and do the save in a do/catch so you can react to both outcomes:
@State private var didSave = false

// in the Save button:
Button("Save draft") {
  do {
    try store.save()
    withAnimation { didSave = true }
  } catch {
    // handle failure — next section
  }
}
// modifier on the Form:
.overlay(alignment: .bottom) {
if didSave {
Label("Draft saved", systemImage: "checkmark.circle.fill")
.padding(.horizontal, 16)
.padding(.vertical, 10)
.background(.green.opacity(0.15), in: Capsule())
.foregroundStyle(.green)
.padding(.bottom, 24)
}
}Tap Save draft and a green pill fades up from the bottom:
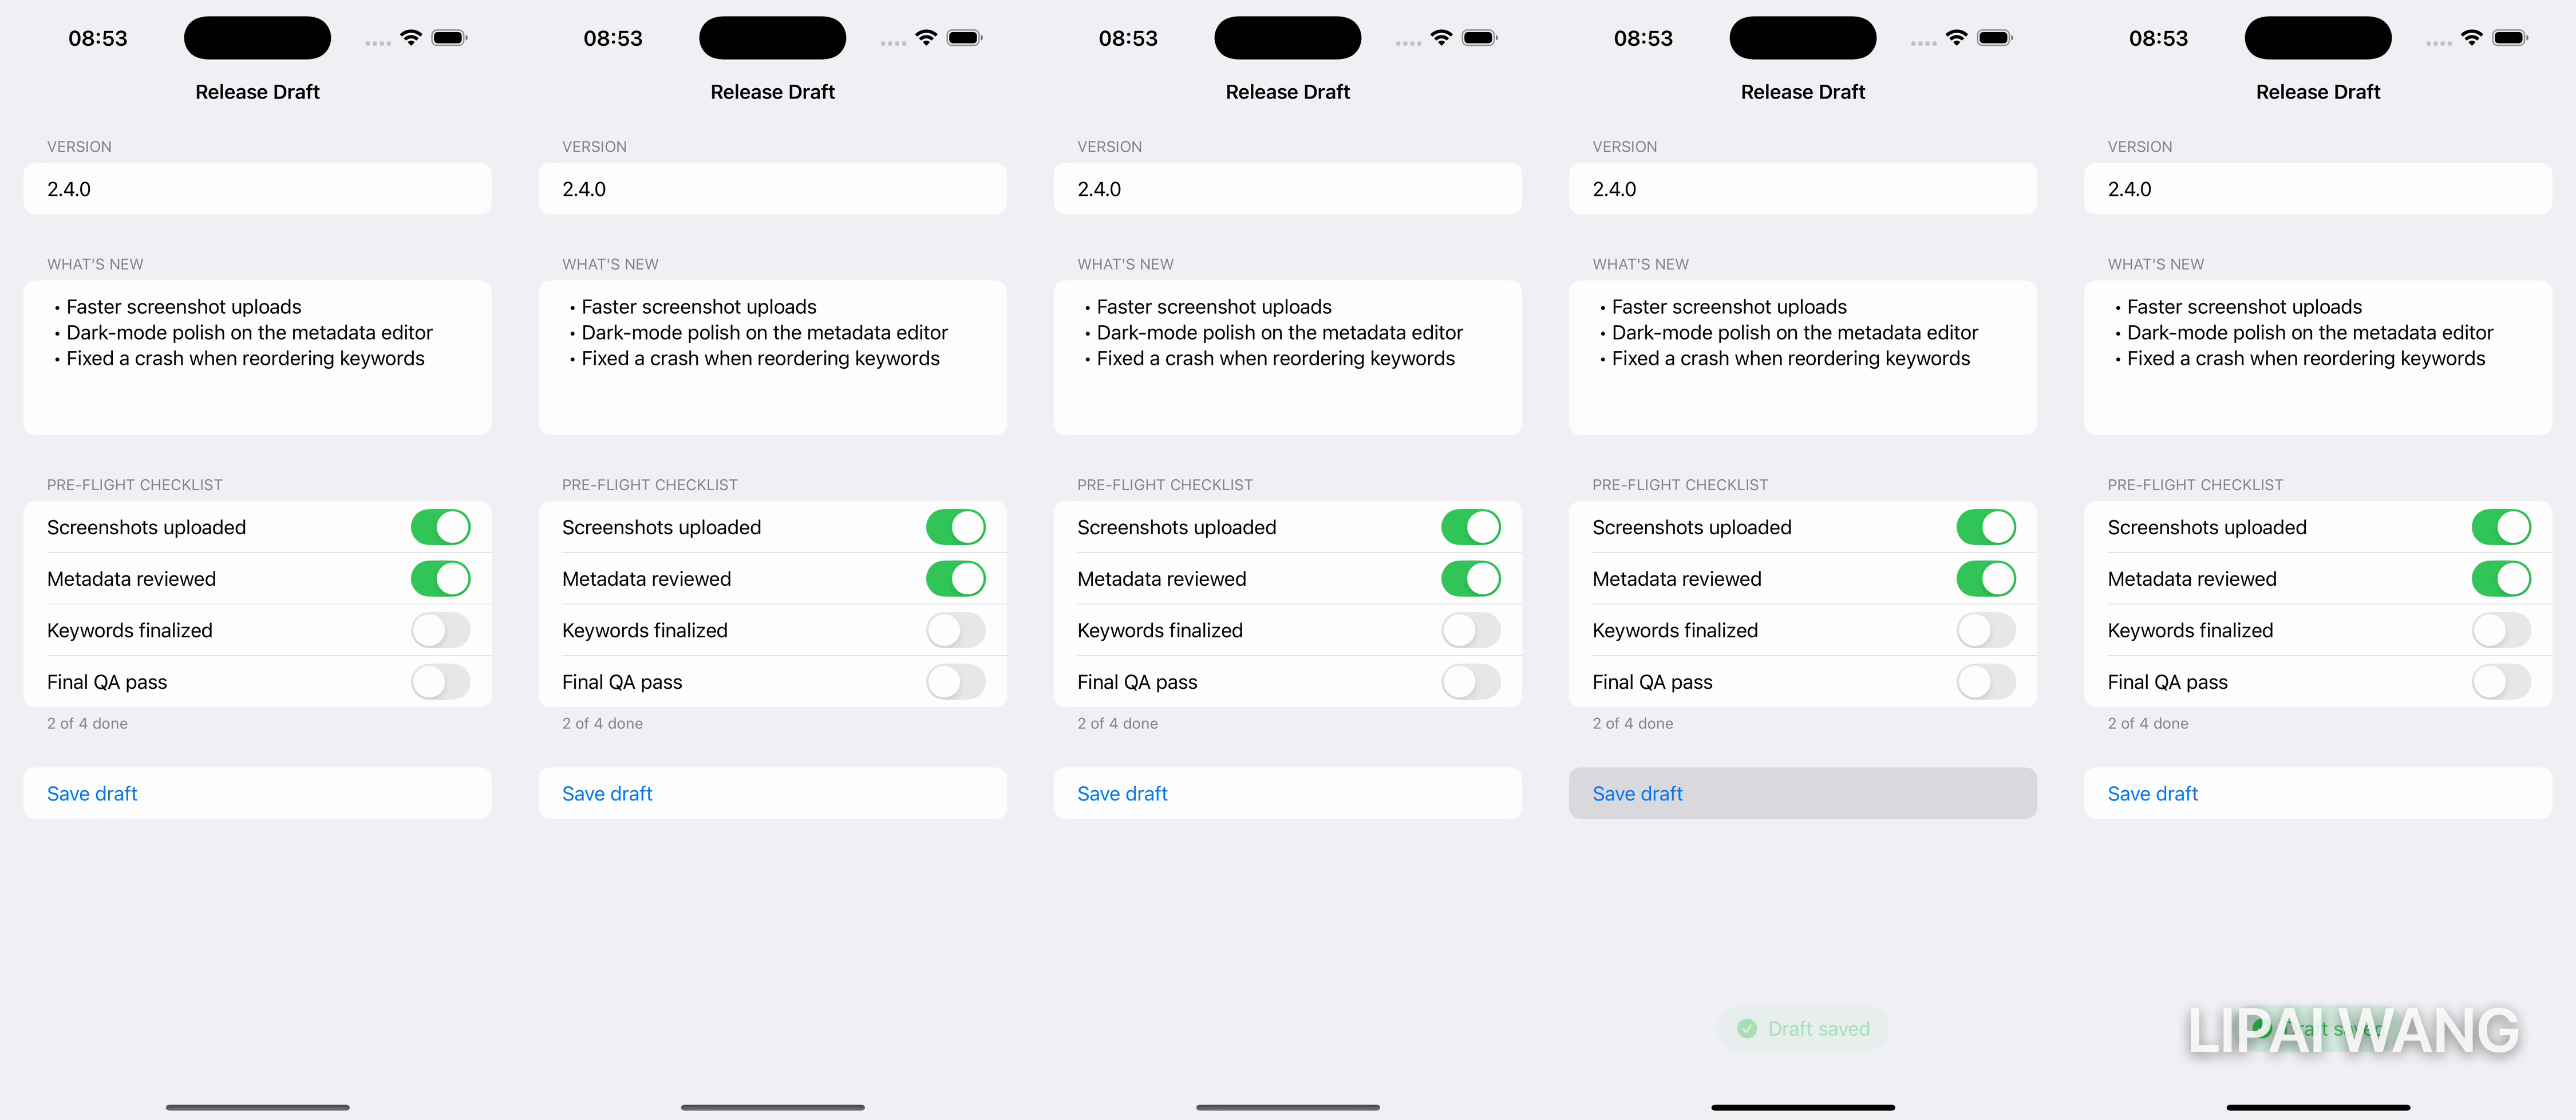
Now the real test of persistence: tap Save draft, fully quit the app (stop it in Xcode), and run it again. The version, the notes, and every toggle come back exactly as you left them — because init() called load(), which decoded the file you just wrote. ShipShape finally remembers.
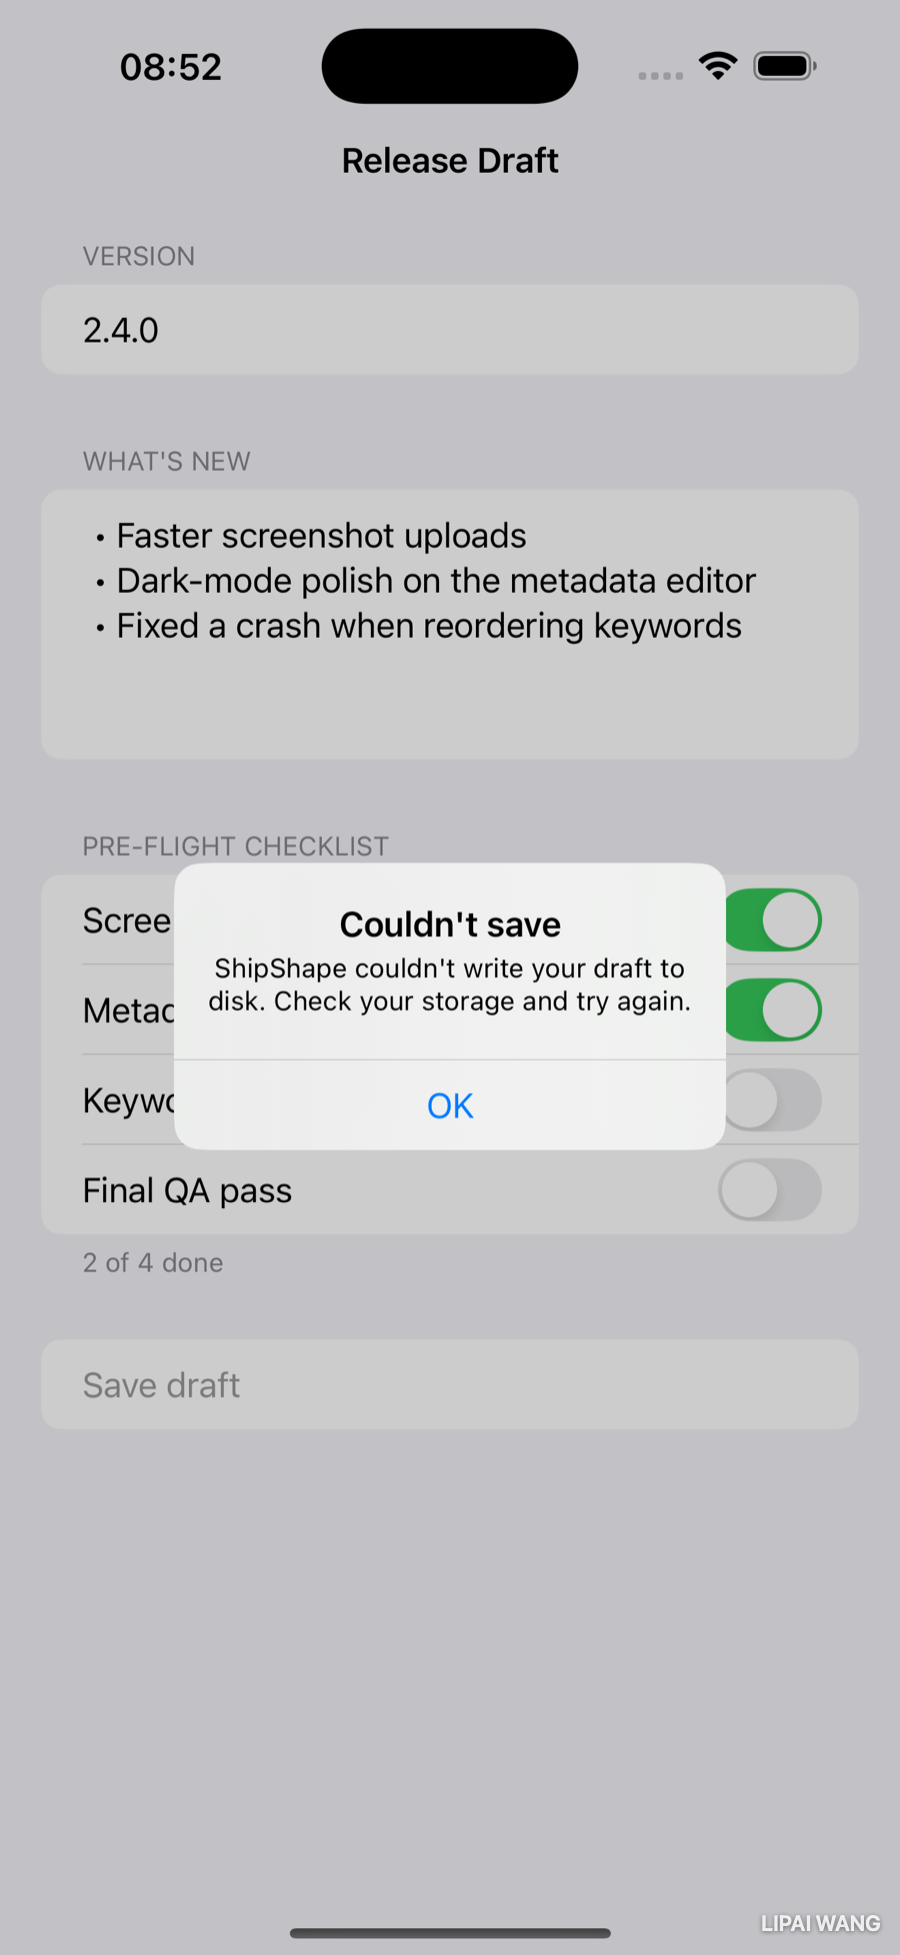
Telling the User When Disk Access Fails
Saving and loading can fail for real — and when they do, a print the user never sees isn't good enough. SwiftUI's .alert turns a Bool into a modal the user can't miss. You already have store.showLoadError, set by the initializer when an existing file won't decode. Surface it.
Add a local @State for save failures and present both through alerts on the Form:
@State private var saveFailed = false// the Save button's catch block:
} catch {
saveFailed = true
}// modifiers on the Form:
.alert("Couldn't save", isPresented: $saveFailed) {
Button("OK") { }
} message: {
Text("ShipShape couldn't write your draft to disk. Check your storage and try again.")
}
.alert("Couldn't load", isPresented: $store.showLoadError) {
Button("OK") { }
} message: {
Text("Your saved draft couldn't be read. Starting fresh.")
}.alert(_:isPresented:) takes a binding to a Bool: flip it to true and the alert appears; tapping OK flips it back to false and SwiftUI dismisses it. Because showLoadError lives on the @Observable store, $store.showLoadError (via @Bindable) gives the alert a binding straight to it. Here's the save-failure alert:
The app now degrades gracefully: a corrupt file on launch starts you fresh and tells you, a failed save warns instead of silently losing work, and a missing file on first run is handled without a peep.
When the Data Won't Stick: A Debugging Detour
Persistence bugs are sneaky — the data looks right one moment and is gone the next. When that happens, don't guess; watch the values change. Click in the gutter to the left of a line number inside save() or load() to set a breakpoint (a blue tab). Run the app and trigger the code: execution pauses on that line, and the area beneath your editor becomes a window into the running program.
- The Variables view lists everything in scope right now — expand
draftand read its real values. - At the
(lldb)prompt, typepo draftto print the object — its full contents — orp store.draft.checklist.countto evaluate any expression against live state. - The step controls let you step over one line at a time or continue to the next breakpoint, so you can watch exactly where a value you expected turns into one you didn't.
A classic culprit for "my data resets": a store that gets re-created instead of reused, so each redraw hands you a fresh, empty one. That's precisely why DraftStore lives in a single @State at the app entry point and travels by .environment — created once, shared everywhere. If a value ever refuses to persist, a breakpoint in init() answers the first question instantly: is my store being initialized more than once?
Key Points
- Pick storage by shape:
@AppStoragefor tiny settings, a file for one structured document, SwiftData/Core Data for many queryable records. - An optional (
Date?) holds a value ornil. Unwrap it safely withif let, reach through it with optional chaining?., and supply a fallback with??. Avoid force-unwrap!— it crashes onnil. guard let … else { return }unwraps for the rest of the function and bails early when a precondition isn't met, keeping the happy path flat.- A closure is a block of code you can pass around.
maptransforms every element of a collection,filterkeeps the matching ones; trailing-closure syntax,$0, and key paths (\.title) make them terse. - Conform a type to
Codableand the compiler synthesizes its serialization.PropertyListEncoder/Decoder(orJSONEncoder/Decoder) convert it to and fromData; write withdata.write(to:options:.atomic). - Mark fallible work
throws, call it withtryinsidedo/catch, or usetry?when anilresult is good enough — as with the expected-missing file on first launch. Define your ownenum: Errorto give callers clean cases to match. - Mark a shared model
@Observable, own it once in a@Stateat the app entry point, inject it with.environment, read it with@Environment(Type.self), and wrap it in a local@Bindablewhen a view needs$-bindings. - Drive a
.alertfrom aBoolbinding to report failures the user would otherwise never see — and reach for breakpoints andpowhen data behaves mysteriously.
Challenge: Add a "Reset Draft"
Give the user a way to start over — and practice the file system and error handling once more.
- Add a method
reset()toDraftStore. It should delete the file withFileManager.default.removeItem(at: fileURL)and then setdraft = ReleaseDraft()to clear what's on screen. - Deleting a file that doesn't exist throws. The user might tap Reset before ever saving, so that case must not crash. Decide how to handle it —
try?is one clean option; ado/catchthat ignores a not-found error is another. Justify your pick in a comment. - Add a Reset draft button in its own
Section, tinted red with.foregroundStyle(.red). Wrap the destructive action in a.confirmationDialogso a stray tap can't wipe the draft. - Stretch: after a successful save, show the
submittedAt-style stamp — callmarkSubmitted()from a "Submit for review" button and display "Submitted MMM d" usingif letto unwrapdraft.submittedAt, falling back to "Not submitted" with??.
Build it, save a draft, relaunch to prove it persisted, then reset and relaunch again to prove the file is gone. When all of that behaves, you've got the full save/load/clear lifecycle — the backbone of every app that remembers anything.
ShipShape now has a memory: it holds a real release draft, keeps it safely on disk, reads it back on launch, and tells the user the moment the disk misbehaves. You've also picked up the everyday Swift toolkit — optionals, guard, closures, errors, and Codable — that you'll reach for in nearly every feature from here on. Next you'll put motion to all this: animating the checklist as items complete, and transitioning between the draft and the celebratory Ready-to-Ship screen, so the app doesn't just remember — it feels alive.

Ultimate iOS Bootcamp: Master Swift & SwiftUI App THE HARD WAY
Ship your apps faster
When you're ready to publish your Swift app to the App Store, Simple App Shipper handles metadata, screenshots, TestFlight, and submissions — all in one place.
Try Simple App Shipper