You archived in Xcode, uploaded, fixed a bug, archived again, uploaded again — and a few rounds later App Store Connect shows a stack of builds you don't want anymore. You open the Add Build picker to attach a build to your version and you're staring at builds 9, 10, 11, 12, 13, most of them flagged Missing Compliance. The natural instinct is "let me delete the old ones." So you go looking for a delete button.
There isn't one. And once you understand why there isn't, the whole thing stops being a problem.
This chapter is the dedicated guide to build management in App Store Connect: why builds can't be deleted, what actually happens to the ones you ignore, what "Missing Compliance" means and how to kill it permanently, the version-vs-build-number distinction that's behind half the confusion, and the small habits (plus a few asc CLI commands) that keep your build list clean without you ever needing a delete button.
The picker you're looking at
Here's the exact screen this chapter is about — the Add Build dialog you open from a version to choose which build goes to the store or to TestFlight:
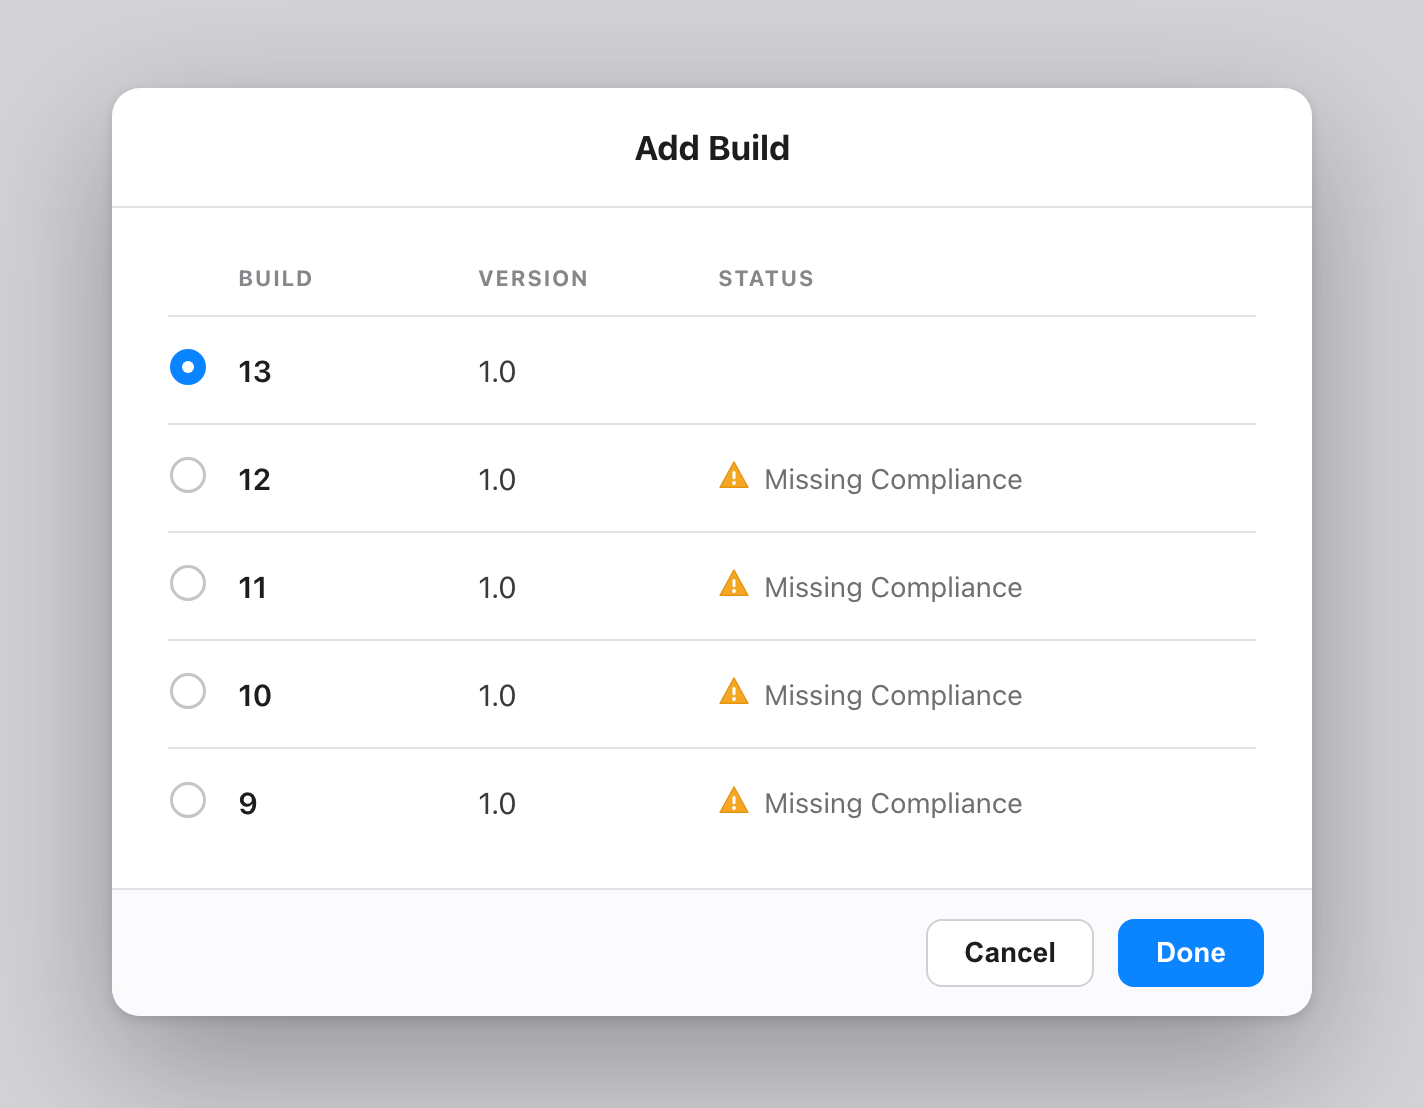
Figure 1 — The Add Build picker. Read the three columns carefully, because they explain everything.
- BUILD — the build number (13, 12, 11, …). This is
CFBundleVersion. It increments every time you upload, and it must be unique and increasing within a version. - VERSION — the marketing version (
1.0). This isCFBundleShortVersionString— the number your users see on the App Store. Notice every build here is1.0: you uploaded five builds of the same version. That's normal and expected. - STATUS — build 13 (selected) is clean; the rest say Missing Compliance. That's an export-compliance question you haven't answered for those builds — not an error, and we'll make it go away below.
The single most important thing on this screen: you only ship the one build you select. Builds 9–12 sitting there cost you nothing and ship to no one. The clutter is cosmetic.
Why there's no delete button — builds are immutable
App Store Connect treats an uploaded build as a permanent, immutable record. Once Apple has processed a binary, you cannot remove it from your account through the web UI. There is no "Delete build" anywhere, and that's deliberate:
- Auditability. Apple keeps a record of every binary you submitted, for review history, legal, and crash-symbolication reasons.
- Build numbers can never be reused. Even if deletion existed, you could never re-upload build 11 — the number is permanently spent. So deleting would only create confusing gaps, not free anything up.
- There's nothing to clean up. A build you don't select is inert. It isn't on the store, it isn't charging you, it isn't visible to users.
Figure 2 — The lifecycle of an uploaded build. The branch you're hunting for ("delete") doesn't exist. The branch you actually want is "select the right one" — and, for TestFlight noise, "expire."
"But I deleted the archive in Xcode and it's still on the web!"
This is the single most common version of the question, so it gets its own answer. Deleting an archive in Xcode's Organizer does nothing to App Store Connect. They are two completely separate places:
- The Xcode archive is a local
.xcarchivefile on your Mac, under~/Library/Developer/Xcode/Archives/. The Organizer's "Delete" just removes that local file to free disk space. It is a housekeeping action on your machine. - The build on App Store Connect is the binary you uploaded to Apple's servers. The instant the upload finished, it became the immutable record described above. Your local archive and the uploaded build are no longer connected — deleting one cannot touch the other.
Figure 3 — Upload is a one-way copy. After it completes, the cloud build stands on its own. Deleting the local archive (the dotted path) only reclaims disk space on your Mac — the web list is untouched, exactly as you saw.
So when your Organizer shows "1 archive" but App Store Connect still lists build 14 as Uploaded to Apple, nothing is broken. That's the system working correctly. To change the web list, use the cloud-side actions — select the build you want, expire old TestFlight builds, or let the 90-day clock run.
"Missing Compliance" — what it is and how to make it disappear
Four of the five builds in Figure 1 say Missing Compliance. This has nothing to do with bugs or rejection. It's the export-compliance / encryption question every build must answer: does your app use encryption, and if so, does it qualify for an exemption? Most apps either use no non-exempt encryption or only standard HTTPS, which is exempt — but Apple still needs the answer recorded per build.
You have two ways to handle it:
1. Answer it in the UI (per build). In TestFlight or when submitting, App Store Connect prompts "Does your app use encryption?" Answer once and that build's warning clears. The catch: you repeat it for every new build.
2. Declare it in Info.plist and never see the prompt again (recommended). Add the key that pre-answers the question so every future upload arrives already compliant:
<!-- Info.plist — most apps (HTTPS / no custom crypto) set this to false -->
<key>ITSAppUsesNonExemptEncryption</key>
<false/>
Set false if your app only uses exempt encryption (standard HTTPS/TLS via the OS, no proprietary crypto). Set true only if you ship non-exempt encryption — and then you'll need the relevant export documentation. After adding this key, new builds upload without the Missing Compliance flag at all. That's why the selected build 13 in Figure 1 is clean and the older ones aren't: the newer one was built after the key was set (or had the question answered).
Version number vs. build number — the distinction behind the clutter
Half the "too many builds" confusion comes from conflating two numbers. They are different fields with different rules:
| Marketing version | Build number | |
|---|---|---|
| Info.plist key | CFBundleShortVersionString | CFBundleVersion |
| Shown as | VERSION column (1.0) | BUILD column (13) |
| Who sees it | Your users, on the App Store | Internal / TestFlight only |
| Rule | One App Store version at a time | Unique & increasing per version |
| Example flow | 1.0 → 1.1 → 2.0 | 1, 2, 3 … reset or keep climbing |
In Figure 1, one version (1.0) has five builds (9–13) — you iterated five times before being happy with the binary. That's exactly how it's meant to work: bump the build number on each upload, keep the version the same until you actually ship a new user-facing release.
Expiring TestFlight builds — the closest thing to "delete"
If the clutter you care about is in TestFlight (testers seeing old builds), you can act. App Store Connect lets you expire a build:
- TestFlight tab → iOS Builds (or the relevant platform).
- Click the build you want gone from testing.
- Use Expire Build (the expiry control on the build's page).
Expiring stops that build being installable by testers and removes it from active distribution — but it stays in your history (still immutable, still not "deleted"). Builds also auto-expire after 90 days in TestFlight, so a lot of old-build noise cleans itself up if you simply wait. Note: App Store (production) builds and the Add Build picker for a released version aren't "expired" the same way — there you just leave the unused ones alone and select the one you want.
Figure 4 — Three valid responses to an unwanted build, none of which is "delete." Match the action to where the noise actually is.
Doing it from the terminal with asc
If you'd rather not click through the web UI, the asc CLI used throughout this project lists and manages builds directly. (See the asc CLI usage workflow for auth setup.)
# List builds for an app, newest first — see every build number + version + state
asc builds list --app "Your App Name"

# Find the latest processed build (the one you usually want to select)
asc builds list --app "Your App Name" --limit 1

# Expire an old TestFlight build by its build number
asc builds expire --app "Your App Name" --build-number 11
The same operations are wired into the SimpleAppShipper Mac app's TestFlight section and exposed as MCP tools, so an agent can list builds and surface "build 13 is processed and clean; 9–12 are expired" without you opening the dashboard.
Mini-exercise: prove the clutter is harmless
Open your own Add Build picker (Figure 1's screen) and answer, in writing:
- How many distinct VERSIONS are listed, vs. how many BUILDS? If it's many builds under one version, you've just confirmed you iterated — not that anything is wrong.
- Which build is processed and compliant? That's the only one that matters; select it.
- Where is the noise — picker, or TestFlight? If it's only the picker, the fix is "click Done." If it's TestFlight, expire the old ones or let the 90-day clock run.
If all three answers are calm, you never needed a delete button.
Challenges
- Kill Missing Compliance for good. Add
ITSAppUsesNonExemptEncryptionto yourInfo.plistwith the correct value for your app (justifytruevsfalsein one sentence), archive, upload, and confirm the new build arrives with a clean status — no prompt, no triangle. - Automate the build number. Wire
agvtool(or a CI step) so every archive gets a unique, increasingCFBundleVersionwithout you touching it. Deliberately try to upload a duplicate number and read the exact error you get back. - Expire and verify. Expire one old TestFlight build via the UI or
asc builds expire, then confirm withasc builds listthat its state changed while it remains in history (proving "expire" ≠ "delete"). - Write the upload-hygiene rule. In one sentence, state when you will and won't upload a new build, so your picker never fills with throwaway binaries again. (Hint: "only upload a build I intend to test or ship.")
Key Points
- You cannot delete an uploaded build. Once Apple processes a binary it's an immutable, permanent record — there is no delete button in App Store Connect, by design. Build numbers, once spent, can never be reused.
- Unused builds are harmless. Only the build you select ships. Builds 9–12 sitting in the picker cost nothing, reach no one, and need no action.
- "Missing Compliance" is the encryption/export question, not an error. Answer it per build in the UI, or — better — set
ITSAppUsesNonExemptEncryptioninInfo.plistso every future build uploads already compliant. - Version ≠ build.
CFBundleShortVersionString(the1.0users see) stays put across iterations;CFBundleVersion(the build number) must be unique and increasing. Many builds under one version is normal. - For TestFlight noise, expire — don't delete. Expiring stops a build reaching testers and keeps it in history; builds also auto-expire after 90 days. In the picker, just select the build you want.
- Hygiene beats cleanup. Auto-bump the build number, pre-answer compliance, and only upload binaries you actually intend to test or ship. Do that and the "too many builds" problem never appears.
Builds pile up because the system is doing exactly what it should: keeping an honest, permanent record of everything you shipped. The fix was never to delete the past — it was to pick the right present and let the rest expire quietly. Next in the series: Code Signing Without Tears — certificates, profiles, and the .p8 key, the part of shipping iOS that actually trips people up.

Ultimate iOS Bootcamp: Master Swift & SwiftUI App THE HARD WAY
Ship your apps faster
When you're ready to publish your Swift app to the App Store, Simple App Shipper handles metadata, screenshots, TestFlight, and submissions — all in one place.
Try Simple App Shipper