Most animation tutorials show you one thing moving and tell you it feels nice. That teaches you very little, because you have nothing to compare it against. "Ease out feels responsive" is a claim you can only evaluate next to ease in, running at the same time, over the same distance, for the same duration.
So this chapter builds a drag race.
Five progress lanes. One button. Every lane leaves at the same instant, travels the same distance, and is given the same duration. The only difference between them is the timing curve. Underneath the lanes, a chart plots what each curve claims it will do, with a playhead riding across it in real time. When the payload in a lane and the dot on the chart agree, you are looking at proof that the curve you wrote is the curve you got.
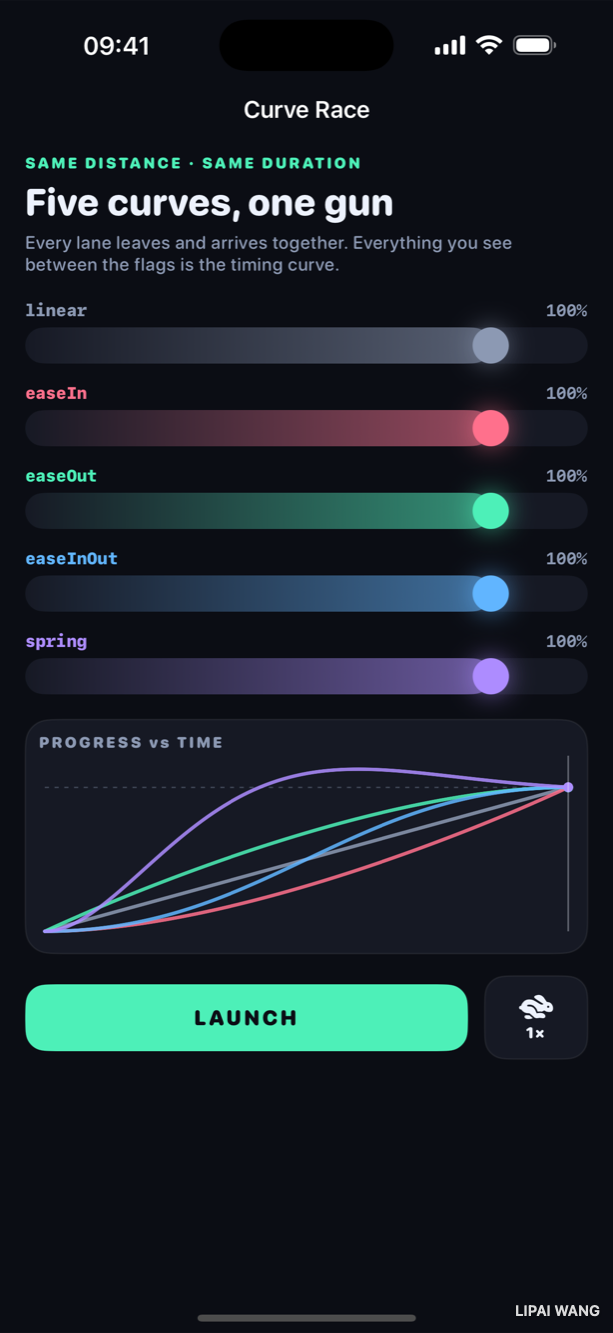
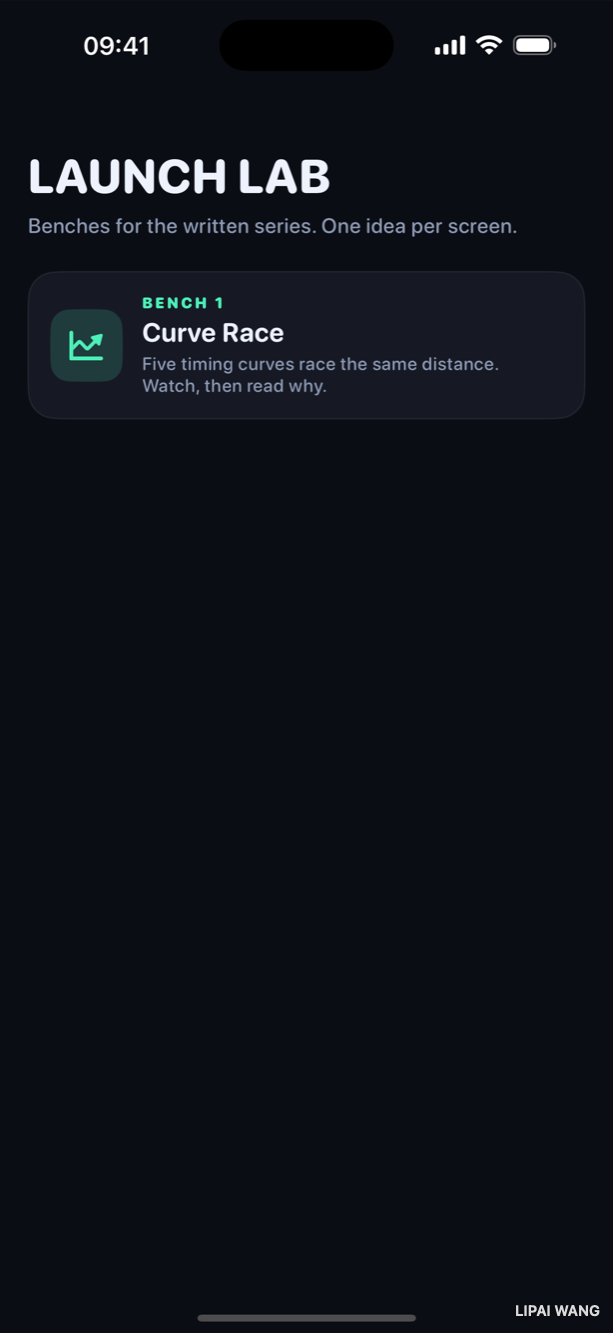
This is Launch Lab, the demo app this whole series is built in. Every chapter adds one bench: a single screen that demonstrates one idea hard enough to photograph. Benches never share state, so you can read any one of them on its own.
The one sentence that explains SwiftUI animation
Everything in this chapter follows from a single idea:
There is no moveTo, no startAnimation(), no completion handler holding your layout hostage. You say "this number is now 1 instead of 0," and separately you say "changes like that one should take 1.2 seconds and follow this shape." SwiftUI works out every frame in between.
That framing decides how you build the race. A lane does not have five properties to animate. It has one:
/// 0 at the start line, 1 at the flag. Every visual in the lane is derived
/// from this one number, so a single animation drives the whole row.
@State private var progress: CGFloat = 0
The payload's position, the width of the gradient fill, the glow, and the percentage readout are all computed from progress. Animate that one number and the entire row moves in lockstep, for free. If you ever find yourself animating four properties in parallel and fighting to keep them in sync, this is the fix: find the one number they are all secretly functions of, and animate that instead.
Two ways to ask for an animation
SwiftUI gives you two, and the difference is about scope.
Implicit animation attaches to a view and watches one value:
Circle()
  .offset(x: progress * travel)
  .animation(.easeOut(duration: 1.2), value: progress)
Read it as a standing instruction: whenever progress changes, animate this view's response to it. You do not say when. The view is holding a rule.
Explicit animation is a scope you change the value inside:
withAnimation(.easeOut(duration: 1.2)) {
  progress = 1
}
Read it as: make this change, and animate everything that depends on it. You do not say which views. The change is carrying the rule with it.
The race uses the explicit form, because each lane needs a different curve for the same state change, and the animation has to be chosen at the moment the gun fires rather than baked into the view:
withAnimation(racer.animation(duration).speed(slowMotion ? 0.25 : 1.0)) {
  progress = 1
}Use implicit when a view should always animate a particular property, no matter who changes it — a chip that should always slide, a card that should always fade. Use explicit when a specific event should animate, and the same property might legitimately change without animation at other times. When in doubt, explicit: it keeps the animation next to the thing that caused it, which is where you will look for it when it misbehaves.
Mini-exercise
Rewrite one lane to use .animation(_:value:) instead of withAnimation, hard-coding .easeOut. Run the race. The lane still works — but now notice you cannot change its curve from the launch button any more, because the rule lives in the view rather than in the event. That constraint is the difference between the two forms.
The four curves, side by side
First, the start line. Every payload at zero, every lane identical, and a faint vertical flag marking where 100% sits — with a deliberate gutter of track beyond it that will matter in a moment.
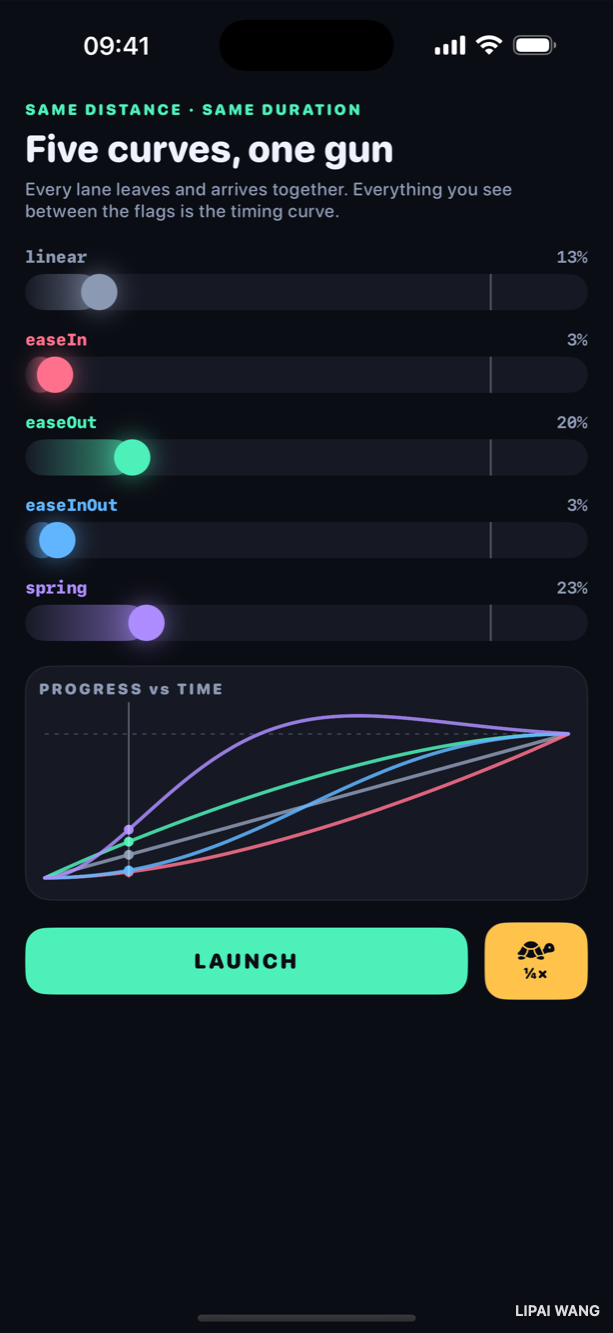
Now the race caught partway through, in quarter speed.
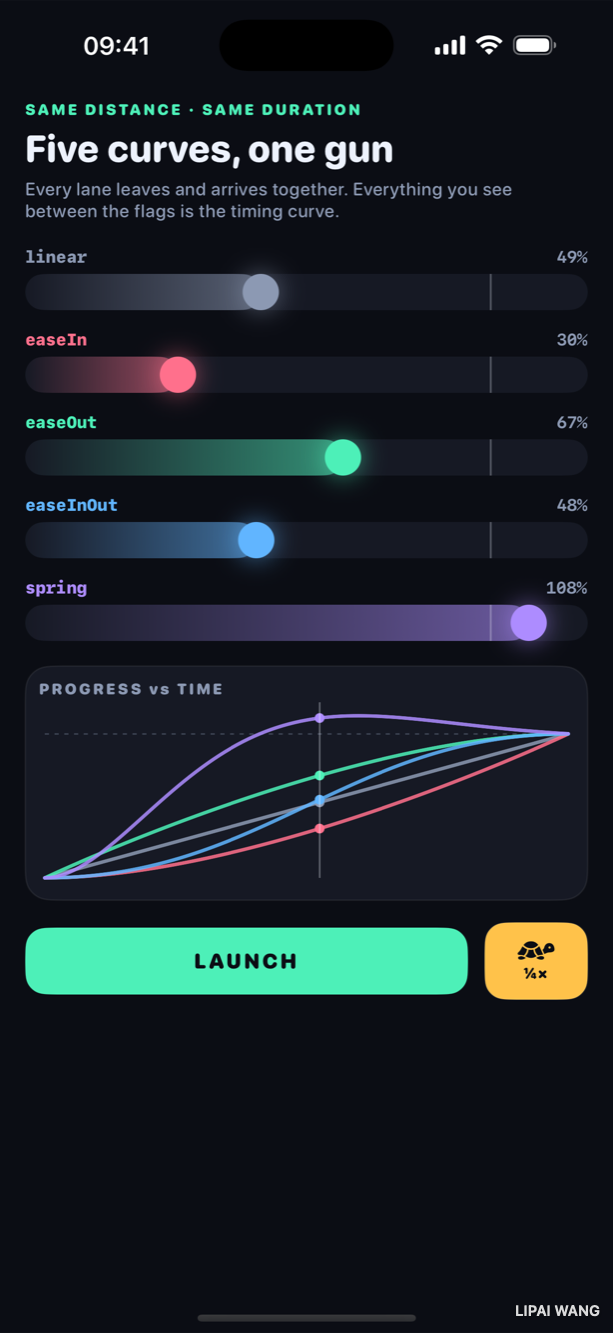
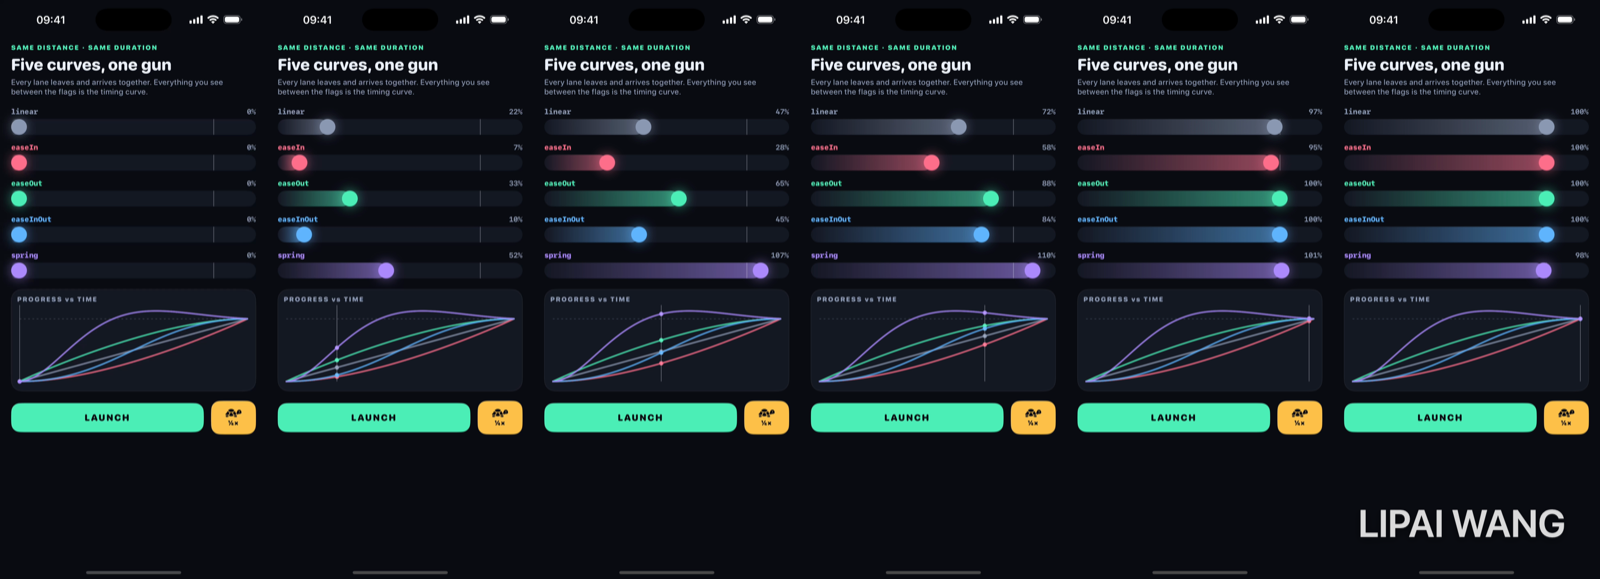
Same gun, same distance, same clock. Look at the spread:
| Curve | At this instant | What it is doing |
|---|---|---|
linear | 49% | Constant speed, start to finish |
easeIn | 30% | Still accelerating out of the blocks |
easeOut | 67% | Spent its speed early, now coasting |
easeInOut | 48% | Through its fast middle |
spring | 108% | Already overshot the flag |
linear covers equal distance in equal time. That sounds like the neutral, obvious default, and it is almost always the wrong choice for an interface. Nothing physical starts at full speed and stops dead. A car passing a window at constant speed looks ordinary; a car going from parked to sixty instantly, then back to parked, looks like a glitch. Reserve linear for motion with no visible start or stop inside the frame — a spinner going round forever, a marquee scrolling through.
easeOut leaves fast and settles slowly. It is the default to reach for when a tap caused the motion, because the fast opening moves the interface under the user's finger immediately. Much of what people call an app's "responsiveness" is just this curve.
easeIn is easeOut backwards: it creeps, then bolts. Watch the rose lane in the filmstrip — at the halfway point it is still visibly last. Applied to a tap, that lag reads as your app thinking about it. easeIn belongs on things leaving: a sheet accelerating off-screen, a deleted row gathering speed as it goes.
easeInOut eases both ends. It is the right shape for motion the user did not personally trigger — a value updating from the network, a layout reflowing, an element repositioning itself. It draws less attention to its start because it does not snap.
Most UI motion belongs between 0.2s and 0.5s. Under roughly 0.15s it reads as a jump cut rather than a movement; past about 0.6s the user is waiting on your animation and it stops feeling like polish. easeIn and easeInOut want the short end, because their slow openings burn budget before anything visible happens. The race runs at 1.2s only so the difference is legible on camera — that is a teaching duration, not a shipping one.
Mini-exercise
Set every lane to linear and run it. The screen goes dead — five identical dots moving in formation. Now set them all to easeOut. Still uniform, but it reads better, and the difference you feel between those two runs is the entire argument for timing curves.
Springs: when duration stops meaning "finish line"
The violet lane is doing something the other four cannot: it goes past 100%.
Racer(
  id: "spring",
  name: "spring",
  animation: { .spring(duration: $0, bounce: 0.45) },
  …
)
A spring is not a curve you drew. It is a simulation: a weight on a spring, released, with friction pulling energy out of the system. It arrives at its target with momentum still in hand, so it sails past, gets pulled back, and settles. That is what "bouncy" means, mechanically.
Two parameters control it in modern SwiftUI:
duration— not the finish line. It is the perceptual duration: roughly how long an equivalent non-bouncy spring would take to get there. The real spring is still visibly settling after it.bounce—0for a spring that glides in and stops dead, positive for overshoot, negative for a slow, heavily damped crawl.0.45is theatrical on purpose; ship something nearer0.15–0.3.
This is why the lanes keep a gutter of track past the flag:
/// How much of the track sits before the flag. The rest is overshoot room.
private let finishFraction: CGFloat = 0.85
Without it, the spring's overshoot clips off the edge of the screen and the most interesting thing in the demo is invisible. That gutter is not decoration — it is the visual budget the overshoot needs. Put a spring on something flush against a screen edge and you are asking for exactly the same clipping.
Here is the race later in the run, with the spring on its way back down:
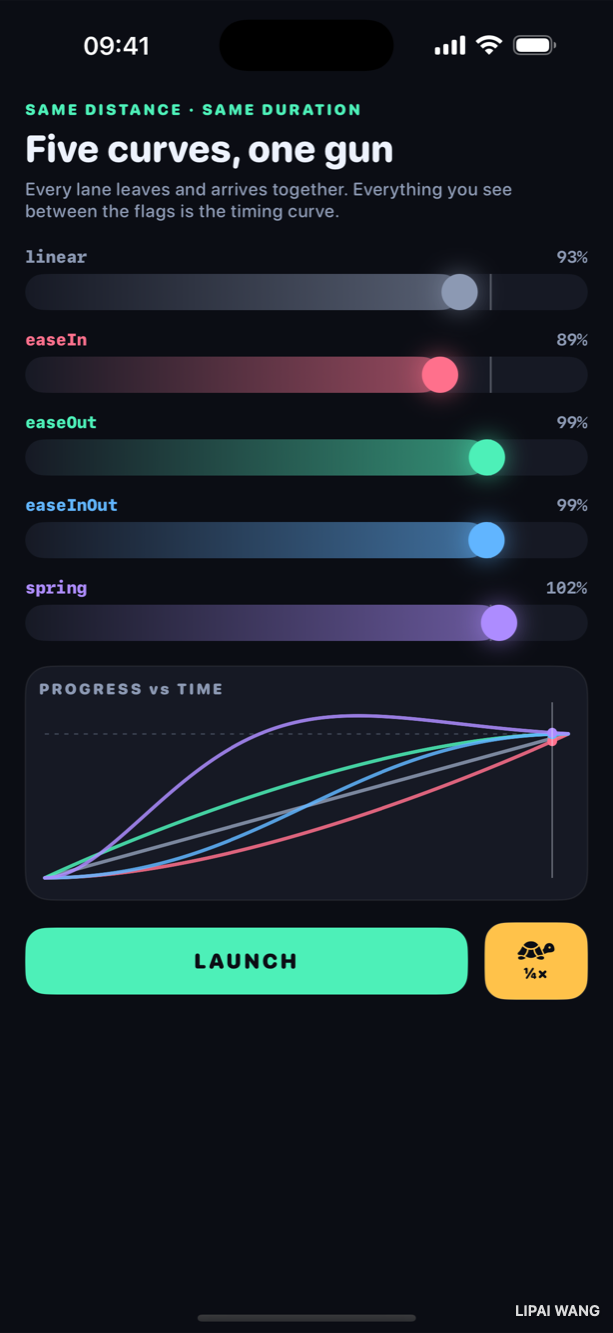
Notice easeOut and easeInOut both read 99% while linear is still at 93%. All three finish together a beat later. The last 10% of an eased animation is where most of its character lives, and it is the part nobody bothers to slow down and look at.
Springs preserve velocity. Interrupt a running spring with a new target and it carries its current speed into the new animation instead of stopping and restarting. That is why springs are the right tool for anything a finger is driving — a sheet you flick, a card you drag and release. A duration-based curve retargeted mid-flight visibly stutters; a spring does not.
Proving the curve is the curve
The chart under the lanes is the part I nearly skipped, and it turned out to be the part that made the bench worth building.
Since iOS 17, the same curve math SwiftUI runs is also available as a plain value you can call. UnitCurve gives you the four timing curves as pure functions, and Spring gives you the spring simulation:
UnitCurve.easeOut.value(at: t)                       // t and result both 0…1
Spring(duration: duration, bounce: 0.45)
  .value(target: 1, time: t * duration)              // may exceed 1 — that is the overshoot
So each racer carries two things that are supposed to agree: the Animation SwiftUI runs, and the function that says where that animation should be at a given moment.
/// A racer carries two things that must agree: the `Animation` SwiftUI runs to
/// move the payload, and the pure function that says where that animation
/// *should* be at a given moment. The chart plots the function; the lane runs
/// the animation. When the playhead and the payload line up, you are looking at
/// proof that the curve on screen is the curve in the code.
struct Racer: Identifiable {
  let animation: (Double) -> Animation
  let sample: (_ unitTime: Double, _ duration: Double) -> Double
}
The chart plots sample. The lane runs animation. Nothing connects them in code. If the violet rider sits above the dashed 100% line at the exact moment the violet payload is past the flag reading 108%, that agreement was earned, not arranged — and you can check it in the screenshot above.
The playhead comes from a different mechanism entirely:
TimelineView(.animation) { timeline in
  let elapsed = startedAt.map { timeline.date.timeIntervalSince($0) } ?? 0
  let head = min(1, max(0, elapsed / window))
  Canvas { context, size in draw(in: &context, size: size, head: head) }
}
TimelineView(.animation) is a per-frame clock. It is not an animation — nothing is interpolating, nothing has a curve. It simply hands you a fresh Date on every display refresh and lets you redraw. That makes it the right tool whenever what you want is "recompute this from the current time," and the wrong tool for "move this from A to B."
Canvas is the other half: immediate-mode drawing, one closure, no view per line. Five curves at 90 sampled points each would be hundreds of views built out of Path shapes; in a Canvas it is one.
Animation— interpolates a value from A to B along a shape. Use for state changes.TimelineView— hands you the current time every frame. Use for things derived from the clock.Spring/UnitCurve— the curve math as a plain function, with no view involved. Use to reason about, test, or draw a curve.
The bug that teaches the most: a label that jumps to 100%
The first version of this bench had a lie in it. Every lane's percentage read 100% from the first frame, while the payload was visibly a third of the way down the track.
The code looked innocent:
Text("\(Int((progress * 100).rounded()))%")Here is what is actually happening, and it is the single most useful thing in this chapter:
The instant withAnimation { progress = 1 } runs, progress is 1. Print it and it is 1. Read it in a condition and it is 1. What SwiftUI animates is not your variable — it is the set of things it knows how to interpolate between two states: frames, offsets, opacities, colors, scales, rotations.
Text is not on that list. A string is not a thing you can be halfway between. So the label rendered its final value from frame one while the offset dutifully animated.
This explains an enormous amount of confusion — every "why does my counter snap to the end" and "why is my if branch already showing the new thing" question is this. The fix is to put the view inside the interpolation by conforming it to Animatable:
/// A percentage label that actually counts.
///
/// `Text("\(progress)")` would snap straight to the final number: SwiftUI sets
/// the *state* to its target immediately and animates only what it knows how to
/// interpolate. Conforming the view to `Animatable` puts the label inside that
/// interpolation — SwiftUI drives `animatableData` frame by frame and rebuilds
/// the body each time, so the number climbs in step with the payload.
private struct AnimatedPercent: View, Animatable {
  var value: CGFloat

  var animatableData: CGFloat {
    get { value }
    set { value = newValue }
  }

  var body: some View {
    Text("\(Int((value * 100).rounded()))%")
  }
}
animatableData is the hook. Conform to Animatable, expose one VectorArithmetic value, and SwiftUI interpolates that and rebuilds your body on every frame with the intermediate value. Nine lines, and the readouts in every screenshot above are now telling the truth — including 108%, which is only possible because the spring really does go there.
Mini-exercise
Delete the Animatable conformance from AnimatedPercent, leaving the struct otherwise identical. Run the race and watch all five labels snap to 100% instantly while the payloads crawl. Put it back. That fifteen-second experiment is worth more than any explanation of the render/state split, including this one.
Making a change that must not animate
Restarting the race has a subtle trap. The obvious code is wrong:
progress = 0                            // back to the start line
withAnimation(curve) { progress = 1 }   // …and go
SwiftUI coalesces both changes into one update. The reset never renders, so the payload animates from wherever it currently is rather than from the start line — fine on the first run, visibly wrong on every run after it.
The reset needs to be explicitly excluded from animation, and it needs its own update:
private func restart() {
  // Snap back to the start line with animation switched off, so the reset is
  // never itself animated, then fire the real animation one tick later.
  var reset = Transaction()
  reset.disablesAnimations = true
  withTransaction(reset) { progress = 0 }

  DispatchQueue.main.async {
    withAnimation(racer.animation(duration).speed(slowMotion ? 0.25 : 1.0)) {
      progress = 1
    }
  }
}
A Transaction is the envelope every state change travels in; withAnimation is really a convenience that puts an Animation into that envelope for you. Setting disablesAnimations puts the opposite in: whatever standing animation rules apply, ignore them for this change. That is the tool for "reset without a rewind," and it is the answer whenever a view animates in from a position it should have simply appeared at.
Two modifiers worth knowing before you need them
Any Animation can be modified after you build it, and the modifiers compose:
racer.animation(duration)
  .speed(slowMotion ? 0.25 : 1.0)
  .delay(0.1)
.speed(_:) scales the clock. 0.25 makes the animation take four times as long — that is the entire implementation of the ¼× button in the bench, and the reason every mid-race screenshot in this chapter exists. Being able to slow your own animations down from inside the app, without a debug menu, is worth the six lines it costs.
.delay(_:) shifts the start without touching the shape or the duration. Give a row of items delays of 0, 0.05, 0.1, 0.15 and you get the staggered cascade that makes lists feel dealt rather than dumped. It is the cheapest expensive-looking effect in SwiftUI.
.speed() and the chartSlowing the animation means the chart's time window has to stretch by the same factor, or the playhead lies:
/// `.speed(0.25)` makes an animation take four times as long, so the chart
/// window has to stretch by the same factor to keep the playhead honest.
private var window: Double { baseDuration / (slowMotion ? 0.25 : 1.0) }
Every time you scale time in one place, something else that measures that time needs the same scale. This is a small instance of a large class of bug.
How these screenshots were actually taken
A note on method, because it was a real obstacle and the fix generalises.
You cannot photograph a 1.2-second animation by tapping a button and then asking for a screenshot. The round trip to send the tap costs longer than the animation lasts — every early attempt came back showing five payloads parked at the finish line. Slow motion helps, but it does not fix the underlying race between the capture tool and the app.
The fix was to stop tapping and let the capture ask for the state it wants:
/// Launch arguments that let the screenshot pipeline drive the app
/// deterministically… These only affect where the app starts. Nothing here
/// fakes a frame: the animation that gets captured is the same one a user sees.
enum LabLaunchOptions {
  static var bench: String?     // -bench curve-race  → open this bench directly
  static var slowMotion: Bool   // -slowmo            → start at quarter speed
  static var bare: Bool         // -bare              → drop the nav chrome
  static var hold: Double       // -hold 1.5          → wait before starting
}
xcrun simctl launch <udid> com.rippaxlabs.launchlab \
-bench curve-race -slowmo -bare -hold 1.5-hold is the one that made recording possible at all. A screen recorder needs about a second to spin up; an animation that fires in onAppear is half over by the first captured frame. So the app waits at the start line until the camera is rolling.
Launch arguments choose the starting state. They never freeze a frame, slow the render, or substitute a still for a moving thing. Every percentage in every screenshot above was produced by the same animation you get by tapping LAUNCH yourself. A capture harness that fakes its output is worse than no screenshots at all, because it teaches you something untrue.
Challenges
-
Add a sixth lane for
.spring(duration:bounce:)withbounce: 0and, separately, a negative bounce. Give each its ownsample. Predict where they will sit partway through before you run it, then check. -
Break the agreement on purpose. Change one racer's
animationto.easeInbut leave itssampleasUnitCurve.easeOut. Run it. The payload and its rider dot now visibly disagree — which is exactly what a broken animation looks like, except now you have a rig that shows you. -
Stagger the start. Give each lane a
.delay()equal to its index times0.08. The lanes now leave in sequence but still arrive in the same order. Work out why the arrival order is unchanged. -
Make the chart honest about the tail. The spring is still settling when the chart's window ends. Extend the window to
duration * 1.6for the spring only and draw the remainder in a lighter colour, so "perceptual duration" becomes something you can see rather than something you read. -
Interrupt a running spring. Add a second button that sets
progressto0.5mid-flight withwithAnimation(.spring). Fire it while the spring lane is at full tilt and watch it carry velocity into the new target. Then try the same interruption on theeaseOutlane and compare.
Key Points
- You never animate a view — you change a value and describe how changes like it should look. Find the one number every visual in a component is a function of, and animate that.
- Implicit (
.animation(_:value:)) is a standing rule held by a view. Explicit (withAnimation) is a rule carried by an event. Prefer explicit when the same property might also change without animation. linearfor motion with no visible start or stop.easeOutfor anything a tap caused.easeInfor things leaving.easeInOutfor motion the user did not trigger. Ship them between 0.2s and 0.5s.- A spring's
durationis a feel, not a finish line. It overshoots, and it needs screen space to do it in. It also preserves velocity through interruption, which duration-based curves do not. - SwiftUI sets state to its target immediately; only rendering is interpolated. That is why a
Textof a number snaps. Conform a view toAnimatableand exposeanimatableDatato put it inside the interpolation. TransactionwithdisablesAnimationsis how you make a change that must not animate — resets, restores, and any "appear here" that keeps sliding in from somewhere else..speed()scales the clock, and anything else measuring that clock must scale with it;.delay()staggers without reshaping.UnitCurveandSpringare the curve math without a view, which means an animation is something you can plot, test, and be publicly wrong about.
The next bench takes the thing this chapter kept sidestepping: what happens when a view is inserted or removed rather than moved. Nothing can interpolate from "not existing," so transitions are a different mechanism with a different set of failure modes — starting with the one where your beautiful fade only plays on the way in.
Read next
Ship your apps faster
When you're ready to publish your Swift app to the App Store, Simple App Shipper handles metadata, screenshots, TestFlight, and submissions — all in one place.
Try Simple App Shipper