In Chapter 2 you built a real HTML page. It's ugly. Default Times New Roman font, links in eye-watering blue, every section crammed against the left edge. That's because HTML's only job is structure — it says what things are, not how they look.
CSS — Cascading Style Sheets — is the "how they look" part. Every bit of visual design on every website on the internet comes from CSS. Fonts, colors, spacing, layout, animations, responsive behavior — all CSS.
This chapter covers the five concepts that unlock the whole language: rule anatomy, selectors, specificity, the box model, and layout with flexbox + grid. By the end you'll be able to take the personal page from Ch 2 and make it look like something you'd actually ship.
What CSS Actually Is
CSS is a list of rules that tell the browser: "when you see an element that matches this pattern, apply these style values."
h1 {
  color: #0071e3;
  font-size: 48px;
  margin-bottom: 16px;
}
In English: "for every <h1> element, set the text color to blue, the font size to 48 pixels, and leave 16 pixels of space below it."
That's it. That's the whole language. Everything else — flexbox, grid, animations, media queries — is just more ways to match elements and more properties you can set. Learn the rule structure first, and the rest is pattern matching.
The three ways to attach CSS to a page
You can put CSS in three places. Pick one and stick with it per project.
<!-- 1. Inline — directly on the element. Fastest, but unmaintainable at scale. -->
<h1 style="color: #0071e3;">Hello</h1>

<!-- 2. Internal — in a <style> block in <head>. Good for single-file demos. -->
<head>
  <style>
    h1 { color: #0071e3; }
  </style>
</head>

<!-- 3. External — a .css file linked from <head>. The standard for real sites. -->
<head>
  <link rel="stylesheet" href="/styles.css">
</head>
External stylesheets win because the browser caches them. One styles.css is downloaded once and reused across every page of your site. Inline styles ship fresh on every page load and scale terribly.
Anatomy of a CSS Rule
Every CSS rule has the same structure: a selector and a declaration block.
Figure 1 — Every CSS rule is a selector + a block of property: value declarations. This is the only syntax you have to learn.
- Selector — the pattern that picks which elements to style.
- Declaration block — curly braces around one or more declarations.
- Declaration — a
property: value;pair. The semicolon separates them. Properties that expect a number usually need a unit (px,rem,%).
Selectors — The 8 You'll Actually Use
CSS has dozens of selector types. Eight of them cover 95% of real work.
| Selector | Example | What it matches |
|---|---|---|
| Element (tag) | h1 | Every <h1> |
| Class | .btn | Every element with class="btn" |
| ID | #signup | The one element with id="signup" |
| Attribute | [type="email"] | Every element with that attribute |
| Descendant | article p | Every <p> anywhere inside an <article> |
| Direct child | nav > a | Every <a> that is an immediate child of <nav> |
| Pseudo-class (state) | a:hover | Every <a> while the cursor is over it |
| Pseudo-element | p::first-line | The first line of every <p> |
You can combine them. This is where CSS becomes powerful:
/* Every .btn that is inside a <form> and is currently hovered */
form .btn:hover {
  background: #0060c0;
}

/* The first <li> of every ordered list in the main content */
main ol > li:first-child {
  font-weight: 700;
}
Read combined selectors right to left. The browser finds all li:first-child elements first, then narrows to those whose parent is ol, then narrows to those inside main. That's how the browser's CSS engine actually works, and knowing it helps you write efficient selectors.
The Cascade and Specificity — "Why Isn't My Style Applying?"
Every front-end developer has stared at a stylesheet for ten minutes asking this. The answer is almost always specificity.
When two rules both target the same element but set different values for the same property, the browser has to pick a winner. It picks the more specific rule. Specificity is a three-number score:
| Selector type | Score |
|---|---|
Element / pseudo-element (h1, p::first-line) | (0, 0, 1) |
Class / attribute / pseudo-class (.btn, [type=email], :hover) | (0, 1, 0) |
ID (#signup) | (1, 0, 0) |
Inline style="" attribute | (1, 0, 0, 0) — beats all selectors |
!important suffix | Nuclear option — overrides everything |
You add scores for combined selectors:
h1             { color: black;  }  /* (0,0,1) */
.title         { color: blue;   }  /* (0,1,0)  — beats the h1 rule   */
h1.title       { color: green;  }  /* (0,1,1)  — beats the class rule */
#hero h1.title { color: red;    }  /* (1,1,1)  — beats everything above */
If scores tie, the rule that comes later in the stylesheet wins. That's the "cascading" in Cascading Style Sheets — rules cascade down the file, later ones overriding earlier ones of equal specificity.
Figure 2 — When multiple rules target the same element, the one with the highest specificity wins. Inline styles beat selectors; !important beats even those (avoid it).
The Box Model — The Most Important Concept in CSS
Every element on every web page is a box. Even text is inside a box. Once you understand the four layers of that box, 80% of "why is my layout broken" questions become obvious.
Figure 3 — The box model. Every element has four concentric layers: content, padding, border, margin.
- Content — the text, image, or child elements.
- Padding — space inside the border, between the border and the content. Background color extends into padding.
- Border — the visible edge. Set
border: 1px solid #cccto see a box around anything. - Margin — space outside the border, pushing neighbours away. Transparent.
You set them with these properties:
.card {
  width: 320px;
  padding: 24px;                 /* all four sides */
  padding: 24px 16px;            /* vertical | horizontal */
  padding: 24px 16px 12px 20px;  /* top | right | bottom | left (clockwise) */
  border: 1px solid #e5e5e7;
  margin: 16px;
  margin-bottom: 32px;           /* just the bottom */
}
The box-sizing rule that fixes the world
By default, width: 320px sets the content width. Padding and border are added on top, so your 320px card is actually 320 + 2×24 (padding) + 2×1 (border) = 370px wide. This confuses everyone.
Fix it once, globally, at the top of every stylesheet:
*, *::before, *::after {
  box-sizing: border-box;
}
With border-box, width: 320px means the outer edge of the border is 320px — padding and border shrink the content to fit. This is what everyone expects. Every real project starts with this line. Do it and never think about it again.
Display — what kind of box is this?
display controls the category of the box.
display: | Behavior |
|---|---|
block (default for <div>, <p>, etc.) | Full width, new line, respects width/height |
inline (default for <span>, <a>) | Flows within a line, ignores width/height |
inline-block | Flows like inline but respects width/height |
flex | Lays out children in a row or column (see next section) |
grid | Lays out children in a 2D grid |
none | Element is removed from the page entirely |
Flexbox — 1D Layout in 30 Seconds
Flexbox lines up children in a row (default) or column. You apply it to the parent; the children become "flex items."
.row {
  display: flex;
  gap: 16px;           /* space between items */
  align-items: center; /* vertical alignment */
  justify-content: space-between; /* horizontal distribution */
}
Every flex container has two axes:
Figure 4 — Flexbox has a main axis (direction items flow) and a cross axis (perpendicular). justify-content positions along main; align-items positions along cross.
flex-direction: row(default) — main axis is horizontal, cross axis is vertical.flex-direction: column— main axis is vertical, cross axis is horizontal.justify-content— how items are distributed along the main axis:flex-start,flex-end,center,space-between,space-around,space-evenly.align-items— how items align along the cross axis:flex-start,flex-end,center,stretch,baseline.gap— space between items (replaces the oldmargintrick). Works in both directions.
The 5 flexbox patterns you'll use constantly
/* 1. Horizontal nav bar, logo on the left, links on the right */
nav { display: flex; justify-content: space-between; align-items: center; }

/* 2. Perfectly centered content (vertically and horizontally) */
.center { display: flex; justify-content: center; align-items: center; min-height: 100vh; }

/* 3. Equal-width cards in a row */
.cards { display: flex; gap: 16px; }
.cards > * { flex: 1; }  /* each child takes 1 unit of available space */

/* 4. Stacked column with even gaps */
.stack { display: flex; flex-direction: column; gap: 24px; }

/* 5. Wrap to next line when out of space */
.tags { display: flex; flex-wrap: wrap; gap: 8px; }
Memorise those five. You'll combine them for 90% of layouts.
Grid — 2D Layout When Flex Isn't Enough
Flexbox does one direction. Grid does two — rows and columns at the same time. Use grid when you need a real table-like layout or when items need to span multiple rows.
.dashboard {
  display: grid;
  grid-template-columns: 240px 1fr;   /* sidebar fixed, main flexible */
  grid-template-rows: 60px 1fr;       /* header fixed, body flexible */
  gap: 16px;
  min-height: 100vh;
}

.dashboard .sidebar { grid-row: 2; grid-column: 1; }
.dashboard .main    { grid-row: 2; grid-column: 2; }
.dashboard .header  { grid-row: 1; grid-column: 1 / span 2; }
Useful mental model:
grid-template-columns: 1fr 2fr 1fr— three columns in a 1:2:1 ratio.fris "fractions of available space."repeat(12, 1fr)— twelve equal columns (classic "12-col grid").minmax(200px, 1fr)— between 200px and one fraction, whichever fits.auto-fit/auto-fill— auto-generate as many columns as fit the width.
The single most useful grid recipe: responsive card grid with no media queries:
.cards {
  display: grid;
  grid-template-columns: repeat(auto-fit, minmax(280px, 1fr));
  gap: 20px;
}
One line gives you cards that are at least 280px wide, auto-wrap to new rows, and stretch to fill. No breakpoints needed.
Positioning — When Layout Isn't Enough
By default, elements follow normal flow: block elements stack top to bottom, inline elements flow left to right. Sometimes you need to escape that.
position: | What it does |
|---|---|
static (default) | Normal flow. top/left/right/bottom are ignored. |
relative | Stays in normal flow, but top/left/etc. nudge it visually without affecting neighbours. |
absolute | Removed from flow. Positioned relative to the nearest positioned ancestor (one with anything other than static). |
fixed | Removed from flow. Positioned relative to the viewport. Stays put when you scroll. |
sticky | Acts like relative until a scroll threshold, then fixed until its container scrolls out. |
The most common pattern — a modal overlay:
.modal-backdrop {
  position: fixed;
  inset: 0;              /* top:0; right:0; bottom:0; left:0; */
  background: rgba(0,0,0,0.5);
  display: flex;
  justify-content: center;
  align-items: center;
}

.modal {
  position: relative;
  background: white;
  padding: 32px;
  border-radius: 16px;
  max-width: 480px;
}
The backdrop is fixed (covers the viewport, blocks scroll). The modal inside is relative (stays in the flex layout but ready for absolutely-positioned close buttons or arrows).
Responsive Design — Media Queries in 60 Seconds
Different screens, same HTML. The @media rule wraps styles that only apply when the viewport matches a condition.
/* Default styles (mobile-first — write these for the smallest screen) */
.nav {
  flex-direction: column;
  padding: 16px;
}

/* Tablet and up */
@media (min-width: 640px) {
  .nav {
    flex-direction: row;
    padding: 24px 40px;
  }
}

/* Desktop and up */
@media (min-width: 1024px) {
  .nav {
    padding: 32px 80px;
  }
}
Mobile-first means you write the small-screen styles as defaults, then add styles at larger breakpoints. The opposite (desktop-first, then undo at small sizes) produces more code and more bugs.
Common breakpoints (these are conventions, not rules):
640px— large phone / small tablet768px— tablet1024px— small laptop1280px— desktop
Units — When to Use Which
CSS has lots of units. Here are the only four you really need.
| Unit | Meaning | Use for |
|---|---|---|
px | Pixels (device-independent) | Borders, tiny adjustments, images |
rem | Root font-size multiplier (usually 1rem = 16px) | Font sizes, paddings, margins — anything that should scale when users change their browser font size |
% | Percentage of the parent's dimension | Widths inside responsive containers |
vh / vw | % of the viewport height / width | Full-screen sections, hero heights |
Default to rem for anything involving text and spacing. Use px only for borders and hairlines (you never want a 0.5px border).
Exercise — Restyle the Ch 2 Page
Take the index.html you built in Chapter 2. Create a styles.css file next to it. Add this line to <head>:
<link rel="stylesheet" href="styles.css">Then paste this into styles.css:
*, *::before, *::after { box-sizing: border-box; }

:root {
  --bg: #0a0a0a;
  --surface: #1a1a1a;
  --text: #e5e5e7;
  --muted: #86868b;
  --accent: #3399ff;
  --border: #2a2a2a;
}

body {
  margin: 0;
  font-family: -apple-system, BlinkMacSystemFont, system-ui, sans-serif;
  background: var(--bg);
  color: var(--text);
  line-height: 1.6;
}

header {
  display: flex;
  justify-content: space-between;
  align-items: center;
  padding: 24px 40px;
  border-bottom: 1px solid var(--border);
  background: var(--surface);
}

nav { display: flex; gap: 24px; }
nav a { color: var(--muted); text-decoration: none; }
nav a:hover { color: var(--accent); }

main { max-width: 760px; margin: 0 auto; padding: 40px 20px; }

section { margin-bottom: 48px; }

h1 { font-size: 32px; margin: 0; }
h2 { font-size: 24px; color: var(--accent); margin: 0 0 16px; }

form { display: flex; flex-direction: column; gap: 12px; max-width: 400px; }
input {
  padding: 12px 16px;
  background: var(--surface);
  border: 1px solid var(--border);
  border-radius: 8px;
  color: var(--text);
}
button {
  padding: 12px 20px;
  background: var(--accent);
  color: white;
  border: none;
  border-radius: 8px;
  font-weight: 600;
  cursor: pointer;
}
button:hover { opacity: 0.9; }

footer {
  padding: 24px 40px;
  text-align: center;
  color: var(--muted);
  border-top: 1px solid var(--border);
}
Refresh the browser. You should see a dark-themed page with a centered main column, a proper nav bar, a styled form, and hover effects. That's every concept from this chapter working together: the box model, flexbox for the header and form, semantic selectors, pseudo-classes (:hover), CSS variables (--accent), and a responsive-safe max-width.
Notice how little CSS it took — under 60 lines — to make something that looks shippable.
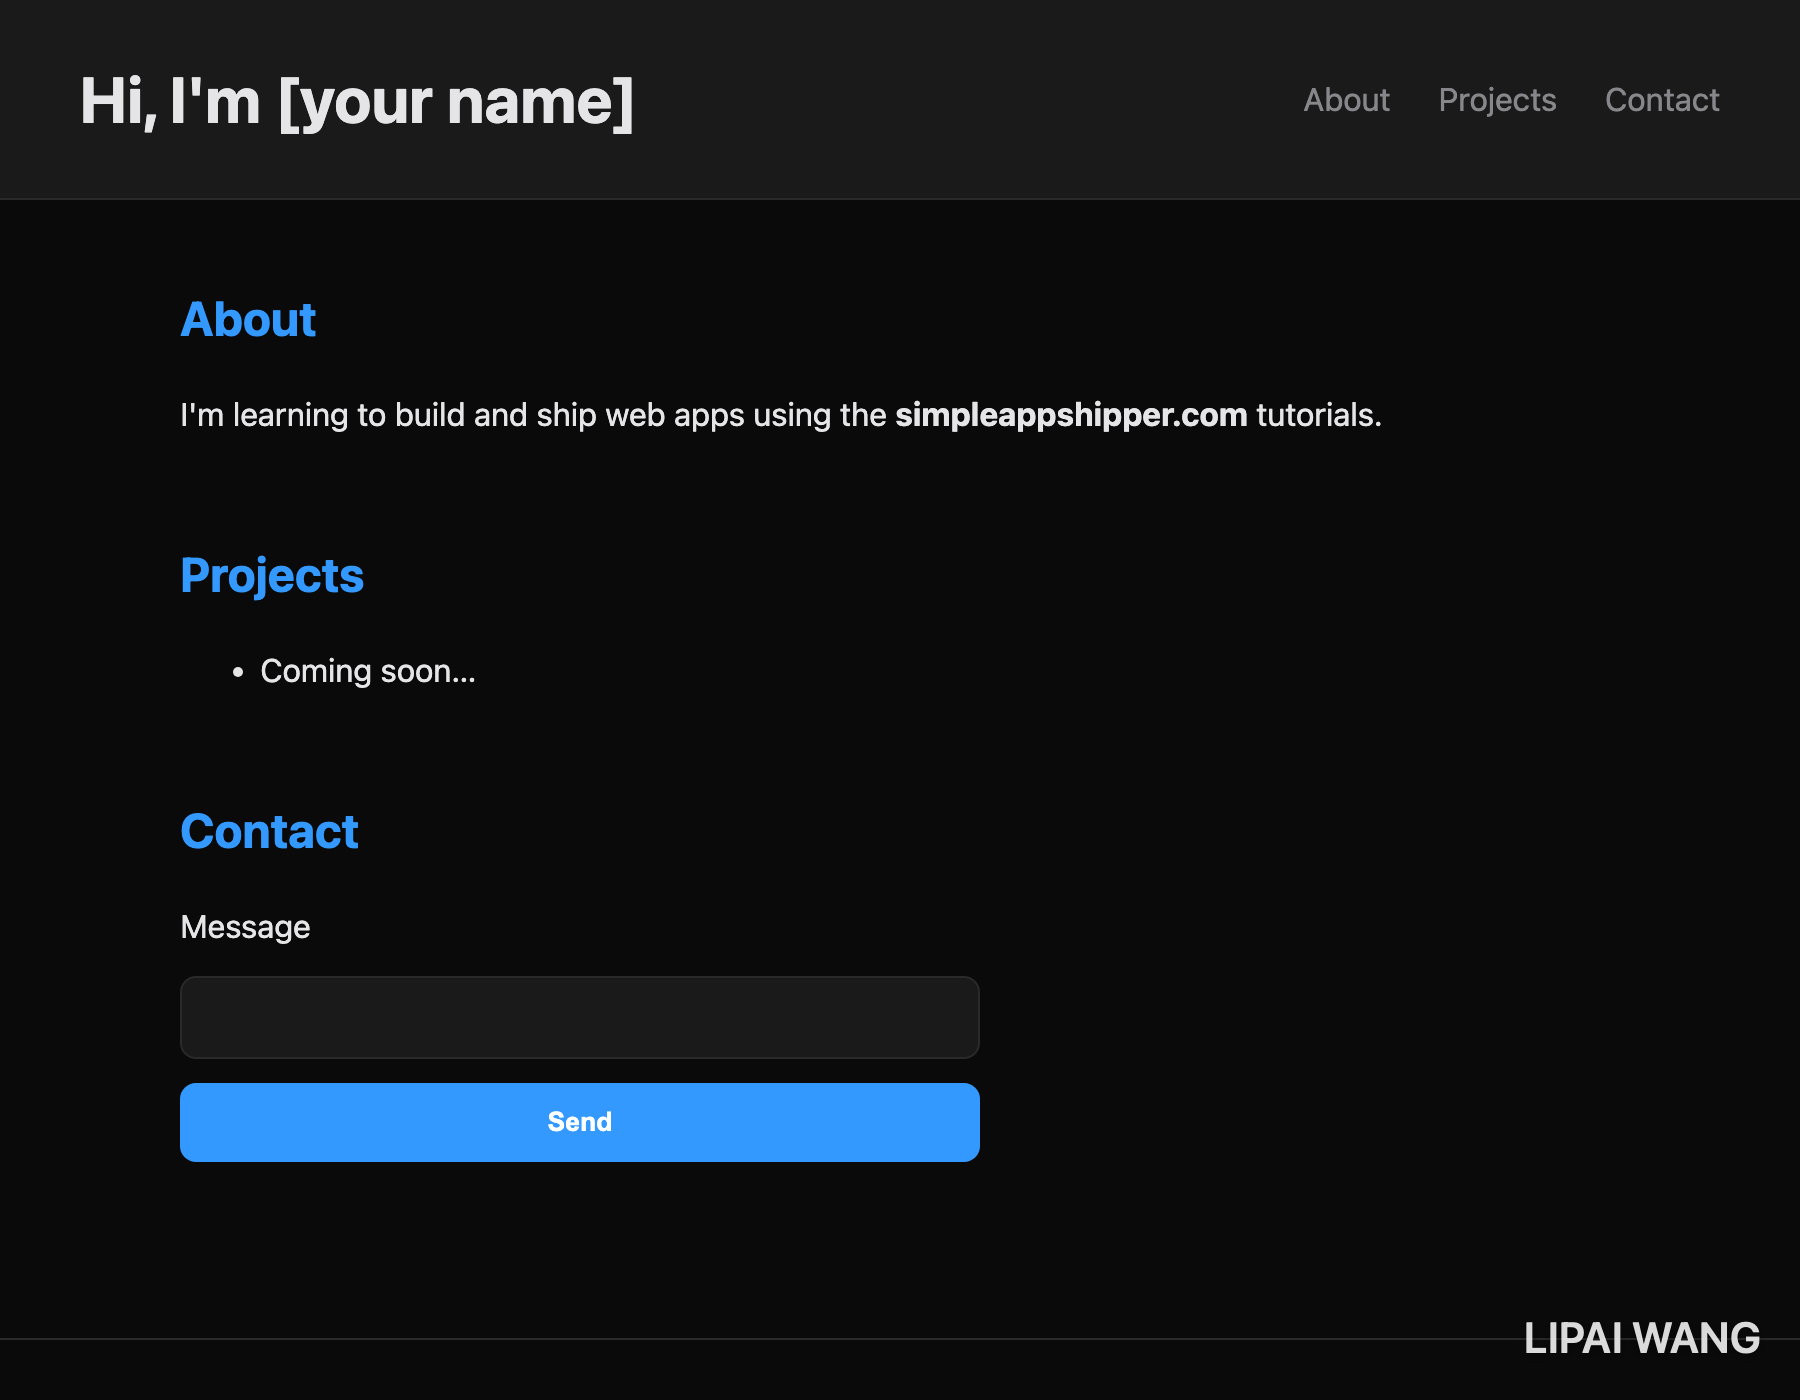
Same HTML as Chapter 2's bare page — only a stylesheet changed. That's the whole point of CSS: structure stays put, the look is a separate layer you can swap at will.
Next Steps
You now know the five CSS concepts that unlock the rest: the rule syntax, selectors, specificity, the box model, and layout with flex and grid. Every styled web page is a remix of what you've just learned.
Next:
- Save your restyled page — we'll extend it in Chapter 5 with real interactivity (JavaScript).
- Inspect a site you like in DevTools — right-click any element, choose "Inspect," then look at the Styles tab. You'll see every CSS rule that's matching it. This is how you learn design by reading other people's code.
- Read the next chapter — CSS Design Systems. We'll turn your ad-hoc variables into a proper design token system that scales to a real product.
Ship your apps faster
When you're ready to publish your Swift app to the App Store, Simple App Shipper handles metadata, screenshots, TestFlight, and submissions — all in one place.
Try Simple App Shipper